Wednesday, January 25, 2012

A Kilo of Spinach

Shopping overseas can be a tricky business.  You’re never quite sure if what you’re asking for makes sense, and you don’t really understand the responses you get.  This has happened to me a few times.  In visiting Mexico once with some friends, I had been prepped for some simple questions in Spanish.  Wanting to try out my newly acquired knowledge, I proudly asked our cab driver ¿Cuanto cuesta? And then stood there staring at him when he answered me in rapid fire Spanish.  My friends agreed I should work on understanding the answers to those questions.
Another time, when I was in Germany I went to get my hair cut and colored.  I had an idea for what I wanted but surprisingly, “A trip to the Hair Salon” was not one of the vocabulary units we studied.  After muddling through what I wanted, the hair stylist nodded and said no problem.  Many highlight foils and a good hour and a half later, she took out everything from my hair and called another stylist over for consultation.  I had not yet seen my hair in the mirror.  After some whispers – they both told me it looked awesome.  I was dubious.  I wound up with three very distinct highlight chunks on my head – white, brown and copper.  It was pretty shocking.  However, I did not, for the life of me, know how to tell her anything besides how awesome it was.  I finally determined that my hair was pretty cool; cooler than me, so I would just have to pretend.
And the other time shopping in a foreign language has left me with deleterious results was also in Germany.  I was walking past the gypsy farm stands behind my dorm and saw a very good price for fresh spinach.  I figured, why not.  Now, the price for spinach was by the kilogram.  When asked how much spinach I wanted, I froze. Extreme panic set in as I scrambled to try and remember what the other delineations of metric weight were.  There are milligrams, centigrams, decigrams, grams, something, something, kilograms.   I had literally no idea how much spinach I wanted nor did I know what measure I should use in the purchase.  So I told the gypsy ‘Ein Kilo’ – one kilo.  That is a lot of spinach.  After cramming a plastic shopping bag full of spinach he looked at me and told me it wasn’t quite a kilo, and did I want it anyways.  I nodded yes. (Similar to my tomato experience this summer).  I completely forgot that I could order the spinach the EXACT SAME way I do here – half a kilo, a quarter kilo, all would have worked just as well.  And if I had managed to remember hectogram I’m sure the gypsy would have thought I was even more crazy. 
So in honor of accidentally ordering way too much spinach, I would like to share the following recipe with you.

A friend of mine made this last winter, and I have been mildly obsessed with it ever since.  The original recipe is a bit different and calls for more ingredients.  Personally, I like this simple version and I don’t think you miss out on any flavor.
Green Quinoa
As adapted from Martha Rose Shulman, New York Times

1 box frozen chopped spinach, thawed
1 ¾ c water, divided
1 small onion, diced
1 Tb olive oil
3 cloves garlic, minced
1 c quinoa, rinsed if necessary
Salt

In a blender or food processor, combine spinach and ¾ cup water and puree.  There will still be some chunks of spinach, but as long as it is mostly liquefied, it will be fine.

In a medium saucepan over medium-high heat, sauté the onion in the olive oil until translucent, about 5 minutes.  Next add garlic, quinoa and a pinch of salt.  Sauté about 3 more minutes, stirring constantly to toast the quinoa.  Add in remaining one cup of water, bring to a simmer, cover and cook for about 5 minutes.  Next add in the spinach puree, and another pinch of salt.  Bring to a simmer, cover and cook for about 15 to 20 minutes, or until the quinoa is cooked and the liquid is absorbed.  Fluff with a fork , check for seasonings and serve.


Wednesday, January 18, 2012

Hmm Bread


I love baking bread.  Well, specifically I love trying to bake bread.  I don’t know what it is, especially considering my almost constant failures at each attempt.  But I love it.  And I keep coming back for more.
Sophomore year of college offered me a unique opportunity to try out bread baking – I had a kitchen in my dorm.  This was still when I was actually a pretty terrible cook and I would experiment quite regularly.  I took my mother’s Homemade Bread Baking book back to college with me and began trying things out.  You may be thinking to yourself – what about studying Jamie? Yeah I didn’t do a lot of that.  I did however manage to read the Lord of The Rings trilogy.  And I made bread.
Now most of the ‘bread’ I am referring to was largely inedible.  I used different flours and completely disregarded proportions of whole grains to all-purpose flour.  Typically, a recipe for bread will yield two loves; mine never did.  I wound up with small loaf pan shaped bricks of varying shades of greyish-brown.  I do not recommend trying to make 100% buckwheat bread.  It’s not good. 
In fact most of my attempts ended in such failure that my college roommate at one point begged me to stop making bread.  Her exact words upon coming into the room one day were “Did you try making bread again?” and I had to sheepishly admit that yes, despite it smelling like freshly baked bread in our dorm, I had produced a 3 pound edible brick (edible being negotiable).  I think I single-handedly kept the demand for flour at the Watergate Safeway grocery store much higher than usual.
I have since gotten a little bit better.  Well, I am still not great at making bread.  I can make a really good Challah thanks to hundreds of tries during my run with the Jewish Cookbook author.  And I can make some other passable breads.  But I am by no means an expert.  So I wanted to share a bread recipe with you.  As long as you follow the directions (very few) and allow the dough to rise (which I forgot once) then you will have some very health and (almost) fool-proof bread. 

Whole Grain Bread
As adapted from Mother Earth News December 2009

This bread works on a pretty simple formula.  However, there are no sweeteners in the recipe, so the bread will be very “healthy” tasting.  I think it is very nice toasted and slathered in butter and jam.  Feel free to experiment with different grains and flours but be sure to keep the ratio the same each time.

5 cups flour (I use all white-whole wheat, but a combo of all-purpose, whole wheat, bread flour etc. could work as well)
2 cups other grains (such as Bob’s Red Mill hot cereals, bran, wheat germ, instant oatmeal etc.)
¼ c vital wheat gluten
2 packets yeast (1 ½ Tb)
1 Tsp. Kosher salt
2 cups warm water


Wisk together all of the dry ingredients in the bowl of an electric stand mixer.  Add warm water (about 90-100°F), and using the paddle attachment, mix until the dough just starts to come together in a ball. 

Cover the bowl with a kitchen towel and allow to rise for about 2 hours, or until the dough has risen and then collapsed back in on itself.

Next, loosely cover the bowl with plastic wrap and refrigerate overnight. 

When you are ready to bake, take about 1/3 of the dough from the bowl and return the bowl to the refrigerator, and use the remaining dough throughout the week (yup it will keep).  Working quickly, shape the dough into a ball, without kneading.  Using your hands, tuck the edges of the dough up under and towards the center of the mass.  Then, place the ball onto a piece of parchment paper and push into a cylinder shape. Cover loosely with a kitchen towel and allow to warm up and rise for about 90 minutes. 

At 60 minutes in, preheat the oven to 450°.  Place a baking stone  on the center rack and a heavy duty cookie sheet on the very top rack.  After 30 minutes, make several diagonal cuts into the top of the bread. 

Place the dough on the parchment paper onto the baking stone.  Pour 1 ½ cups of water into the cookie sheet in the top pan and quickly shut the oven door.  Bake bread for about 45 minutes, turning the cookie sheet as necessary to brown evenly.  About 10 minutes before it is done, slide the bread off of the paper and directly onto the stone. 

Allow the bread to cool and serve.  Repeat baking steps throughout the week with the remaining dough.  Baked bread can be frozen as well, so if you bake it, store it wrapped in plastic and aluminum foil in the freezer.


Wednesday, January 11, 2012

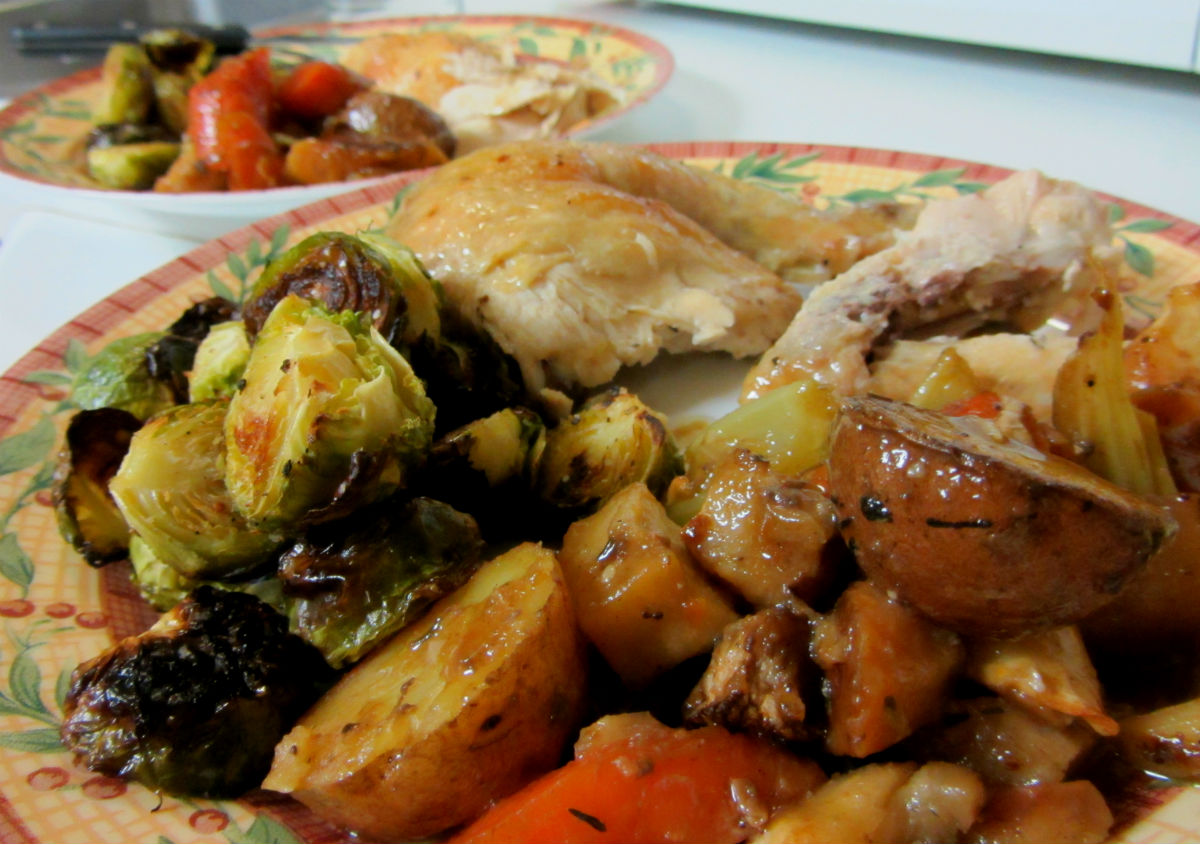
Breakfast, Lunch, Chicken

When I was a freshman I would pass a restaurant on the way to an after-school program I volunteered at that had a sign out front – Breakfast, Lunch, Chicken.  No and, no dinner, just chicken.  I loved it.  They served breakfast, yup, lunch, sure and oh chicken. It still makes me chuckle to think about it. 
Now, Joe loves roast chicken.  It may be his favorite meal, although claiming an all-encompassing favorite meal is tricky and forces a commitment I just don’t think anyone can rightfully make.  But he sure does love roast chicken.  I like to roast chicken for the leftovers and usefulness a poultry carcass can offer.  Stock, soup, chicken pot pie, chicken salad, chicken and biscuits – the list goes on.  So for the price of one chicken you can get approximately 3 meals out of it.  I like those economics. 
I think here it is important to note that an organic chicken will roast and taste much better than a conventional chicken.  Yes the price is higher and the bird smaller, but it will make all the difference in this recipe.  Conventional birds have a lot of fat on them.  So much that I doubt this recipe would turn out well if everything was soaked in that much partially warmed chicken fat.  I don’t like to tell people what to eat when it comes to organic, free-range, local, vegan, sustainable or whatever because everyone has a budget to deal with and their own ideas and feelings in regards to food.  But, in this instance if you purchase an organic bird and taste the results of roasting it in this manner – you will not be disappointed.  (And you may not go back to conventional whole birds).
It has taken me a few tries to perfect this, or at least to feel confident enough to share it with you.  The greatest mistake I make in roasting chicken is to not give myself enough time.  I would like to think that I can come home from work, wash dishes, clean up and roast chicken all in about 2 hours – nope.  It always turns out undercooked and not nearly as wonderful, as when I give the chicken its proper time.  So the next time you have 4 hours – yes 4 hours (it might be more like 3 and a half) before dinner needs to be done – roast a chicken.
Don’t let the 4 hour time scare you; you will only be active for hmm about 30 minutes of it.  We found out this method from Thomas Kellers’ Ad Hoc at Home and it really changed the way I roast chicken.  It’s very simple and really, really makes some outstanding chicken.
 

Roast Chicken and Vegetables
As adapted from Ad Hoc at Home

If you don’t have kitchen twine and the thought of trussing a chicken (think poultry bondage) scares you, don’t worry about it.  Just try to cross the chickens legs and use a toothpick to pin the flap of skin up over the cavity of the bird.  And if you don’t want to do that – don’t even worry about it.


For the Chicken
1 whole chicken
¼ large onion, cut in chunks
2 cloves garlic, smashed (not chopped)
1 bay leaf
½ lemon, cut into 4 pieces
2 sprigs Fresh thyme, or 1 tsp. dried thyme
¼ tsp. dried rosemary
Salt and Pepper

For the Vegetables
Remainder of large onion, cut into chunks
2 cloves garlic, smashed
2 medium carrots, cut into ½” slices
2 stalks celery, cut into ½” slices
6 or 7 small red potatoes, cut in half
2 medium parsnips, peeled and cut into ½” slices
1 medium turnip, peeled and cut into ½” chunks
2 sprigs fresh Thyme
1 Tb olive oil
¼ tsp. dried rosemary
¼ tsp. dried marjoram (if you have it)
Salt and pepper
¼ c white wine (optional)


First, take the chicken out of its packaging, rinse and pat dry.  Allow to sit at room temperature for an hour. (This is not long enough to worry about food poisoning)

After about 45 minutes, begin prepping the vegetables and preheat the oven to 475°.  Sprinkle the inside of the chicken with salt and pepper.  Place the onion pieces, garlic, lemon, bay leaf, thyme and rosemary inside the cavity of the chicken.  Tuck the wings of the chicken underneath the breast, you may have to break the wings in order for them to stay there.  If trussing the chicken, take a piece of twine about 3 feet long and move it under the middle of the bird.  Next bring each side of the twine up over the wing joints, and along the bottom edge of the chicken breasts, crossing over at the opening of the cavity – this will plump up the chicken breast. Next, take the twine and wrap them over and then under the legs tying the legs together and closing off the cavity.  Make sure the little tail flap is tucked up underneath the legs, so that the cavity is completely closed. 

Rub the outside of the chicken with another sprinkle of salt and pepper.

Place the remaining vegetables in a cast iron skillet, or heavy roasting pan.  Toss with olive oil, thyme, rosemary, marjoram, salt and pepper.  Place the chicken on top of the vegetables.

Place pan on the center rack in oven with the legs and bottom of the bird facing inwards and cook for 45 minutes.  Then, turn the oven down to 400° and continue to cook for about another hour, or until the chicken is fully cooked. Turn the pan at the time you lower the temperature so that the breast is now facing the inside of the oven.  About 20 minutes into the lower heat cooking time, check the vegetables to make sure there is enough liquid in the pan, if not pour in white wine and continue to cook.

The chicken is done when I thermometer inserted into the thigh reads 160°, and the juice from the chicken runs clear.  You should also have a nice reduced chicken gravy in the pan with the softened vegetables.   Allow chicken to rest for about 15 minutes before carving and serve with vegetables and pan juices.


Wednesday, January 4, 2012

Happy New Year. I hope you had a wonderful holiday season and are ready to begin another new year. To get things started right I thought I would share another breakfast recipe with you. Because, if breakfast is the most important meal of the day, then it must be at least equally so for the first breakfast of the New Year.

I know some people like to eat foods that will bring them luck in the New Year; black eyed peas, marzipan pigs, and my personal favorite, pickled herring. Yes, that’s right pickled herring. Now, I am not one to turn away foods, but this is one point where I might make an exception. I can clearly remember my grandmother plucking a slimy silver chunk of fish from a bowl at the stroke of midnight, tilting her head back and swallowing. Well, she most likely used a fork and a small plate, but in my childhood memories, she used her fingers and swallowed those suckers whole. I have no idea if she liked pickled herring, but I do know that she liked disgusting her granddaughters with them.
Apparently my grandmothers’ family believed that eating pickled herring at midnight on New Year’s Eve would bring good luck and good fortune in the coming year. And it would be just like her to make sure she ate one every year at midnight whether she wanted to or not. It was the proper thing to do. Since my grandmother passed away no one has even mentioned procuring a jar of pickled herring, and I don’t think anyone misses the smell.
For me ringing in the New Year is about having fun with family and or friends. And as long as I can stay awake until midnight (naps are allowed in my book) then it was a successful night. This year Joe and I had friends come visit us in Maine for the holiday and it was wonderful. Complete with sparkly New Year’s Eve tops for all the girls and coordinating Crayola hair extensions purchased from the local grocery store. Yes Crayola apparently makes hair extensions.
And then in the morning we all awoke at a reasonably late hour, decided to nix the polar bear plunge idea, and cracked open the last two bottles of champagne for mimosas. Using up the holiday Panettone in French toast was a great way to get ready to sit and watch hours upon hours of sports.

French Toast Panettone
Panettone is a sweet Italian egg bread studded with candied fruits and nuts and can be found in pretty much any grocery store around the holidays. The idea for this came when Joe and I had purchased a large panettone and were unable to eat it before it went stale. Any kind of stale bread makes great French toast.

1 panettone
4 eggs
¾ c whole milk (or half and half)
¼ c cugar
1 tsp. vanilla
Bacon grease or butter for cooking.

Slice the panettone into reasonable sized pieces, or if you like the comedic large slices, go ahead and use those. If the bread is fresh allow it to sit out for about an hour before cooking so that the slices are a bit stale.

Whisk the eggs, milk, sugar and vanilla in a large bowl until thoroughly combined.

Preheat a griddle over medium heat and add bacon grease or butter (I usually make bacon in shifts to keep the griddle perpetually coated in grease – remember the pancakes recipe? Yeah.)

Dredge the sliced of panettone in the egg and milk mixture and carefully place onto griddle. Cook for about 2 minutes per side, flipping occasionally. Be sure the bread is cooked through - it should be a little stiff and should not ooze any of the egg when you press it with the back of a spatula.

Repeat dredging slices and cooking until all of the bread has been used up. Place cooked French toast on a platter and keep in a warm oven until ready to serve.


Friday, December 16, 2011

Almost Almond Macaroons

We have come to the end of the cookie testing, and I am glad that I did it. I had a few hits and a few more misses. And as per usual, I have left the most difficult cookie recipe to try for this weekend. So if you hear me cursing and throwing ingredients around the kitchen, don’t be alarmed.

In hindsight I wish that I had really cooked the s**t out of some new cookie recipes, but alas my time was taken away from me. So I apologize for only giving you a couple of usable cookie recipes and only a few posts this month as well. I feel as though I have really dropped the ball on this whole sharing recipes for the holiday’s thing.
This week I made almond macaroons after seeing an old episode of Baking with Julia. The cookies seemed so simple to make, and are a favorite Italian bakery treat for Joe and I. I figured, why not. Instead of using the recipe from that episode (mostly because it called for 8 oz. of almond paste and I could only find a tube of 7oz.) I instead used the recipe inside the box. And typically, this method works out just fine. Well, except for the Tollhouse chocolate chip recipe on the bag, I find that it is a little too much butter if you don’t refrigerate the dough before baking, but that’s just me.
Anyways, this recipe gives you very almond-y flavored cookies which is wonderful, but they are a bit too chewy for me. I feel like a dog eating peanut butter when I chomp into one of the cookies. Aside from that, the cookies are good, and simple to make.

I think I have narrowed down my Christmas cookie selection to the following:
Peanut Butter Chocolate Chip Cookies
White Chocolate Cranberry Oatmeal Cookies
Jam Filled Cookies
Chocolate Mint Cookies (previous post)
Italian Tri-Colore Cookies
And if the mood strikes me, maybe something else.
I’ll let you know next week which ones worked out the best!

Almond Macaroons7oz. Almond paste
½ c sugar
Pinch of salt
¼ c egg whites


Preheat oven to 350°. Line two baking sheets with parchment paper.

Grate the almond paste and place in the bowl of a stand mixer. Add the sugar and salt and mix on medium speed to thoroughly combine. Add in egg whites and mix until the dough everything is well incorporated, scraping down the sides of the bowl several times (about 5-7 minutes).

Scoop cookie dough into a pastry bag, or releasable bag and snip off one corner. Pipe the dough in a snail like formation onto the cookie sheet.

Next dampen a cotton kitchen towel and gently smack the cookies to remove the lines from piping. Bake for about 12 minutes or until the edges are a light golden brown.

Let cool on the baking sheet. To remove the cookies from the paper, lift the paper, wet your fingers, and moisten the paper directly underneath the cookie. Then peel the cookie from the paper. This will help get the cookie cleanly off of the paper. Store in an airtight container. Makes about 2 dozen.

Thursday, December 1, 2011

Fun in Foil

This post will not be about cookies.  I will admit to being weak-minded and buying cookies this week at the supermarket.  And when you already have some cookies in the cupboard, then you really oughtn’t make more cookies on top of that. 
Or at least that’s how I am dealing with my guilt about not producing another cookie recipe for you, and right before the Holidays too, sheesh.
Instead, I wanted to share with you some pictures from Thanksgiving and one of the recipes I have now made a few times which will be good all winter and into early spring.
As you know I grew some beets and leeks (I actually managed to get 3 leeks!) in my tiny little garden this year.  So I had a surplus of beets on hand come the end of harvest.  I love the idea of eating things that don’t necessarily seem to work together – and that is what this recipe is all about.  It is incredibly easy to prepare and is a very different way to get that side of vegetables onto your dinner plate.
I do recommend using Chioggia, golden or even white beets as standard beets will stain all of your pretty vegetables a bright pink.  And if you can find multi-colored carrots, use those too – it really ups the pretty factor.

Beets, Carrots and Leeks in foil

2-3 medium beets (Chioggia, golden or white)
2-3 medium carrots
1 large leek
1 Tb olive oil
3Tb white wine
3 sprigs of fresh thyme
½ tsp dried tarragon (or 1 ½ tsp fresh)
Salt and pepper to taste
Aluminum foil


Preheat the oven to 375° or preheat the grill.  Peel and chop the beets and carrots.  Arrange two sheets of foil, overlapping each other, on the countertop or work surface.  Pile the chopped beets and carrots onto the center of the foil.  Thoroughly wash and dice the leeks, add to the top of the vegetable pile.  Gently fold up the sides of the foil to create a little wall, pour on oil and white wine.  Add the thyme sprigs, tarragon, salt and pepper and toss to coat vegetables.  Fold foil up over the vegetables creating a tight seal, so none of the liquid spills out.  Place foil packet onto grill for 20-30 minutes until it smells magnificent and the vegetables are softened.  Or, place foil packet on a cookie sheet and cook in the oven until the vegetables are softened.

Serves 4 as a side dish

Wednesday, November 16, 2011

Another Look at Cookies

Again, let me apologize for not sharing a good recipe with you last week.  I have a better one this week – I promise. 
So toward the end of college I was working for a cookbook author, preparing to work again with the Smithsonian Folklife Festival’s Foodways section, and waitressing in a bar.  That meant I was thinking about and dealing with food pretty much continually.  I didn’t eat too much food as I was incredibly busy, subsisting off of single pop tarts and hamburger halves through thesis writing and graduation.  (I realized this was a bad idea when I grabbed a hamburger from the bar I worked at, ran to pick up graduation tickets, said hello to a friend’s family, answered two telephone calls from my own family and began choking on said hamburger in front of my former advisor; I thought I should really move on to something that required less chewing.)
Anyways, around this time I started tinkering with my own recipes.  I made a pretty awesome strawberry rhubarb pie and some wonderful cookies.  I wrote down the recipe for the pie, but neglected to take my cookie recipe to paper.  Thus, I forgot the recipe.  But, I remember what those cookies tasted like. 

Have you ever eaten something but wanted it to be a little more spectacular?  Like, wow this chocolate chip cookie is good, but what if it had peanut butter in it too?  That’s the way I felt about the Archway chocolate cookies you find in the grocery store.  I had bought them for a project my step-sister was doing for her special-ed classroom – Ice Cream sandwiches.  The Archway cookies are big, flat and easy to handle.  They offer a large area for spreading ice cream which is always a big deciding factor in making ice cream sandwiches.  The chocolate cookies are good, but they were missing something – mint.  Now, if you are not a fan of chocolate and mint I am sorry, you are missing out.
These cookies are a little temperamental, they are superb when cooked exactly right and kind of duds when baked a little too long.  Although as long as you use a timer when baking, you should be fine.  (I don’t use a timer, and this comes back to bite me in the butt every so often).  These cookies store well in an air-tight container making them perfect for baking and sharing, but they also make a very handsome ice cream cookie sandwich.


Chocolate Mint Crinkles
as adapted from Bon Appétit Dec. 2000

2 sticks butter, softened
1 ¾ c sugar
2 eggs
¾ tsp peppermint extract
2 cups white whole wheat flour
1 c cocoa powder
1 tsp baking soda
½ tsp baking powder
½ tsp salt
Large Granulated decorating sugar


Preheat oven to 350°.  Line 4 baking sheets with parchment paper.  In the bowl of a stand mixer, cream butter and sugar together until light and fluffy.  Add the eggs and peppermint extract and mix to combine.

In a separate bowl, combine flour, cocoa powder, baking soda, baking powder and salt.  Add the dry ingredients to the butter mixture and mix until just combined.  Roll dough into 1 ½” balls and place on a cookie sheet spacing about 2” apart.  Press dough on the balls to flatten them to about ½” thickness. 

Sprinkle cookies with decorating sugar, and bake until the cookies are firm around the edges, but soft and crackled in the center – about 12 minutes.  Rotate pans if the cookies are baking unevenly.  Cool on trays for about 5 minutes and then move the parchment with cookies off of trays.  Allow to cool, and enjoy.