Showing posts with label Main. Show all posts

Wednesday, July 11, 2012

It's Hot Out - Let's Have Soup!

In between my freshman and sophomore years at college, one of my roommates invited some of us to go sailing in Casco Bay here in Maine.  Another roommate and I traveled up and we spent the next few days motoring around the bay in a sailboat under cloudy cold skies.  I should also say that both my roommate and I were intensely sea sick for that time as well.
Don’t get me wrong it was beautiful, but I was at that time unaccustomed to the fact that Maine can be 55° at midday during the summer.  It also was not very windy, which meant the “sailing” portion of our trip turned into using the diesel engine on the boat to slowly maneuver us around island (this engine was referred to as the ‘diesel donkey’).  Thus the seasickness I had was not of the “chumming for large sport fish” variety but a dull and constant nausea. 
Angry Lobster!
There were of course some wonderful experiences; stopping on an island and shell hunting, sleeping all together on the tiny galley table that pushed down to become a bed, and lastly stopping at a restaurant on the final day for some lobster bisque.  The lobster bisque was very tasty although I could only manage to swallow a few sips, again due to that lingering seasickness. 
Now, as I understand it lobster stew/bisque/chowder has basically 4 ingredients; broth, cream, butter, lobster.  And although this combination is very delicious, it is not the lightest meal to consume.  If the stew sits any longer than 30 seconds, the layer of butter separates to the top making a lovely orange shimmer along the surface of the bowl or pot. 
Since this summer has been decidedly un-Maine-like where it has actually been warm to hot even, the idea of consuming a large bowl of cream and butter didn’t sound that appetizing.  But, lobster prices are incredibly low right now, and Joe and I try to reserve tucking into whole steamed lobsters for when we have company, which lead me to thinking about lobster bisque.  So how should one go about making a lighter version of the traditional bisque? By adding vegetables of course! So the next time you feel like making soup during this incredibly hot summer, may I suggest a lovely Lobster Corn Chowder.

Lobster Corn Chowder
This recipe is really an amalgamation of recipes, but it is most closely related to the Williams Sonoma Lobster Corn Chowder

I had a bag of frozen lobster stock ready to go for this dish, but if you don’t I recommend using the one in the above recipe link.


2 1-1/4 pound lobsters
3 slices of bacon, diced
1 medium onion, diced
2 medium carrots, diced
1/4 c. white wine
4 cups lobster stock
1 lb. potatoes, diced (red skinned or fingerling)
3 ears fresh corn, shucked
2/3 c. heavy cream
3 scallions, sliced
10 cherry tomatoes, quartered (optional)
Fresh chives, chopped
Hot sauce, optional


In a large pot place 2 inches of water, heavily salted. Place the lobsters in, cover and steam for about 7 minutes, or until the lobsters are bright red.  Remove lobsters from pot and set aside to cool.

Next, cut the corn off of the cob, and reserve both the cobs and the kernels.

In a large stock pot over medium-high heat, sauté bacon to render the fat, add diced onion and continue to cook for another 5 minutes.  Add diced carrots and cook another 5 minutes.  Next add the white wine, and scrap off any brown bits on the bottom of the pan, simmer until the wine is mostly evaporated.  Add the lobster stock and corn cobs, bring to a boil.  Next add the potatoes, and the white part of the scallions, and cook for about 10 minutes.  Add the heavy cream, bring to a boil, then reduce to a simmer.  Toss in corn kernels.  Continue cooking for another 10 minutes. 

Pull lobster meat from lobsters – knuckle and claw meat can be left intact, but chop tail meat into bite sized pieces.  Add lobster meat to the chowder.

Just before serving add in the remaining scallion greens.  Ladle into bowls and add chives and tomato quarters.  A dash or three of hot sauce in each bowl is a great addition right before eating – it will enhance the creaminess!


Thursday, April 19, 2012

Best Bratwurst

Now that the weather has turned warm again, we can all spend a little more time outside.  If you are like me, then you want to combine being outside with eating and drinking.  Joe and I have developed a pretty good system of doing just that.  But when we take it on the road – that’s when things really get good.
Please let me explain.  I don’t mean that Joe and I are good at getting drunk in public (although…), I mean that we enjoy a long afternoon of eating a little, drinking a little and repeating.  We developed this while living in California.  There was a street festival in a little beach town that offered tickets to various restaurants at a discounted price.  For instance the Thai restaurant would sell you a spring roll for 2 tickets, and tickets were a dollar each.  The point was to wander around and sample food.  Joe and I just took it to the next level.  We would try a dish of something, then head in to a bar to try a drink of something.  Usually there were one to two drinks for every dish.  The whole event was called a “Stroll and Savor” but when you outpace the eating with imbibing it quickly becomes a “Stagger and Savor” which is what we affectionately call it now.
We do this still on nice evenings; walk to our bustling one block main street, sample various appetizers and happy hour specials, then stagger our way home.  How, you may ask, does this tie into being outside – well I like to sit outside while we are at restaurants.  So there.  Some people like to get sporty in the sun, I like to get full.
The first time I ever did something like a stagger and savor was in Germany at a wine festival.  There were booths of vendors giving away samples of wine and other vendors selling food.  After hitting two or 3 wine vendors, my friends and I would go to a food vendor and share something like a crepe or pastry. 
Where we decided not to share was at the Brat tent.  The traditional way to eat German sausage, was one sausage on a piece of rye bread with lots of onions, sauerkraut and mustard.  If you are lucky, like we were on this occasion, you will sit with Germans who ask you disparaging questions about America and American culture.  “No, not all women marry for money in America. Yes, I understand that all of our reality-dating shows are based off of that premise. No I cannot offer you any high-profile examples of for love marriages.  Yes, I suppose you are right; we are a pretty greedy lot.” 
But really, I would like to focus back on the food here.  This is super easy to prepare.  The hardest part will be in procuring the best ingredients.  It is best to enjoy this meal outside with plenty of cold beer or white wine.  And if you want to stagger around afterwards, please be my guest.

Beer Brats
As with most things in life – local is always better.  If you are fortunate enough to find local sausage, local bread, local sauerkraut and local mustard – do it! If not, try to get the best quality of all of them.  For instance the kosher sauerkraut in the refrigerated section of the grocery store is far better than the canned version.

4-6 bratwursts, uncooked
2 large yellow onions
1 large keg can of beer, or 2 bottles of beer (dark or medium lager is good)
4-6 slices of 100% rye bread – or dark whole grain loaf
Fresh sauerkraut
Strong whole grain mustard

Poke the sausages with the tip of a sharp knife several times; this will help prevent the sausages from exploding while you cook them.  Place them in a large saucepan.  Cut one onion in half, and then into slices, add to the sauce pan.  Next, cut the remaining onion in half and cut off top, but leave the root end intact.  Peel off the skin, and add the onion halves to the pot.  Cover with beer.

Bring to a boil, then reduce and simmer for about 10-12 minutes.  Check back frequently to make sure the beer doesn’t boil over. Meanwhile, prepare your grill for the sausages and the onion halves. 

Drain the sausages and onions from the beer.  Reserve the slice onion pieces for the sandwiches.  Grill over medium-high heat the sausages and onion halves until the sausages are golden.  Set out a platter with the rye bread, sauerkraut, boiled onions and mustard. 

To serve, each person makes and open-faced sandwich using the above ingredients; the more mustard and sauerkraut the better.

Wednesday, March 21, 2012

Gnocchi Guru

A friend of mine asked me if I could make gnocchi this past winter.  She told me that her daughter had gnocchi at an Italian restaurant in New Hersey and had really enjoyed it.  She was hesitant to buy the dehydrated shelf stable gnocchi at our local grocery store for fear that it would not measure up to her daughter’s expectations.
I have made gnocchi before, and each time with different results.  I have poured over many a recipe, website and magazine article.  I even got a secret family recipe from a college friend once for his grandmother’s gnocchi.  But due to the mixed results I seem to produce, I was a little hesitant to volunteer to be a gnocchi guru.
In looking over even more recipes, I found one that included some egg, and seemed to give some step by step instructions.  The gnocchi could be produced in a grand total of 2 hours, which is the max attention span time limit when making food with children.  There was enough “waiting” time in which small ones can leave the kitchen and run around before coming back and getting to work.
I find that the most difficult part in making gnocchi; is making it look good.  You can gently roll the little sections of dough off the back of a fork and create a little groove with dimples or you can simply stick your finger into each piece and flick it to create a small hallow space.  Thankfully, a friend volunteered to do that part, which is why these gnocchi look good.  I lose patience after about a dozen segments and the appearance of my gnocchi deteriorate greatly as the process wears on.
This was a wonderful project to take on with friends, children playmates and a little booze.  It make the tedious turn into a joyful experience, and I think that is exactly the way almost every meal should be approached.  The adults here were so enamored with the gnocchi that several very picky children expressed excitement in trying the end result. 
And for the little girl who was to compare the homemade gnocchi with her restaurant version – she told me it was even better than that dish she had in New Jersey.  Now that is a pretty wonderful compliment.


Homemade Gnocchi
As adapted from  Jenifer Mangione Vogt found on Food52.com

 1 ½ pounds russet potatoes, scrubbed and pricked all over with a fork
1 – 1 ¼ c flour
3 egg yolks (whites reserved)
Pinch of nutmeg
Large pinch of salt and pepper


Preheat the oven to 425°.  Roast the potatoes in their skins for about 45minutes to an hour (depending on their size).  They are done, when the skins appear to be a bit loose, and there are some darker brown spots on the potatoes.  Let the potatoes cool.

Peel the potatoes, removing the thicker tough layer just under the skin.  Grate the potatoes on the large holes of a box grater, and place in a large bowl.

Add in the egg yolks, flour, nutmeg, salt and pepper.  Begin to stir this together to fully incorporate everything.  Once the mixture becomes more stiff, use your hands to fully combine into a dough.  If the dough won’t stay together easily when pinched, add some of the egg whites. Or if the dough seems too wet and sticky add a bit more flour – keeping in mind you will need some flour to roll the gnocchi out.

Once the mixture is combined, divide it into 4 even pieces.  Roll these pieces out into a ½” diameter rope.  Cut the rope into ¾” pieces.  Roll each piece off the back of a fork, pressing slightly to make groves in the gnocchi, or simply press your finger into each piece, roll it gently towards you and then flick it away.

Place the gnocchi on a parchment lined baking sheet in a single layer, and freeze for about 15 minutes.

Meanwhile, bring a large pot of salted water to a boil.  Once the gnocchi are frozen, drop 7-10 in the pot at a time.  Once they float to the surface, skim them out, and place on a kitchen towel lined sheet.  Repeat with remaining gnocchi until all are cooked.  At this point, you can refreeze the gnocchi to save them for later, or you can add them to a sauce. 

We baked ours in a mixture of cheese, spinach and heavy cream for an easy gratin.


Wednesday, February 29, 2012

Lascivious Lentils

To begin with, I must share a little story, and then on to the post.  A friend of mine noted on last week’s recipe that he was going to cook it as he was trying to impress a vegetarian.  Now, I have acted as wing-man before and I am happy to oblige with any kind of recipe suggestions for just such a purpose.  I know that if I was a vegetarian, even if I didn’t really like kale or tofu I would be very impressed by any man cooking me a vegetarian meal.  There are certain meals, I think that can immediately upon seeing the effort that goes into them that can ‘impress’ someone.  I considered asking him to tell me after the date and dinner if he succeeded in ‘impressing’ her.  And if the answer is yes, I may start rating all of my post on a scale of how likely they are to ‘impress’ someone. (We all know what I mean by ‘impress’ right?) And, Matt, if that worked the recipe below might work as well, I rate it a 7 or 8 on the impressing scale.
Lentils are apparently a super food.  Or at least I think they were at some point.  To be honest I am a bit tired of hearing about super foods.  I just like to eat food, ok? So I will eat what I like and if that happens to be extra good for me, then so be it.  But I find that when we brand something as really great for you or cancer defying or age slaying that people tend to focus too much on consuming only those products. 
Don’t get me wrong, I love the Alice and Wonderland idea of taking a tiny bite of something that says eat me and then shrinking down in size.  However, we all know it doesn’t happen that way.  And since only celebrities seem to be able to drink kale juice three times a day for a year, I choose to just stick with my original plan of eating good food that is also good for me.  Plus if I stuck to only super foods, I would probably subsist on the bad forms of them; like kale chips, sweet potato fries and blueberry muffins. 

However, if you have not tried lentils before; please do, they are lovely.  You may have even already unwittingly eaten lentils in an Indian dish.  There are so many different kinds of lentils that when recipes call for specific ones (orange, split, French and so on) it can be overwhelming, especially since my grocery store only carries one kind.  And those are just labeled “Lentils”.
These regular lentils are a bit softer and will cook faster than French lentils, and thus they can lose their shape a bit as well.  But they are cheap and readily available and I think they work very well here.  Another great thing about this recipe is that it is quick and relatively easy to make.  I like to top the whole thing with some Italian sausage (local or chicken sausage to keep it on the healthy side) but the lentils with vegetables on their own are quite tasty. 

Lentils with fennel
As adapted from Gourmet 2007
 
1 c lentils
4 c water
1 Tb olive oil
2 large carrots, diced
1 large fennel bulb with fronds, bulb diced and fronds chopped
1 medium onion 
¼ tsp fennel seeds
¼ c fresh chopped parsley
1/8 c red wine vinegar


In a medium saucepan over high heat, combine lentils, water and a large pinch of salt.  Bring to a boil and then reduce heat and simmer, uncovered for about 15-20 minutes, or until lentils are tender.  Some may split but most should still retain their shape. Reserve about ¼ c of the cooking water and drain lentils.

While the lentils are cooking, heat the olive oil in a large frying pan over medium high heat.  Sauté the carrots, fennel, onion and fennel seeds stirring occasionally.  Cover and continue cooking about 10 minutes or until the vegetables are soft.  Add in cooked lentils, fennel fronds, parsley and red wine, if the mixture looks a bit dry add in the reserved cooking water.  Season with salt and pepper.

If using sausage, prick the sausages with the tip of a knife and cook in a separate pan while the vegetables are cooking.  Once fully cooked, move the sausages to a cutting board and slice. 

Serve the lentils topped with sausages.

Wednesday, January 11, 2012

Breakfast, Lunch, Chicken

When I was a freshman I would pass a restaurant on the way to an after-school program I volunteered at that had a sign out front – Breakfast, Lunch, Chicken.  No and, no dinner, just chicken.  I loved it.  They served breakfast, yup, lunch, sure and oh chicken. It still makes me chuckle to think about it. 
Now, Joe loves roast chicken.  It may be his favorite meal, although claiming an all-encompassing favorite meal is tricky and forces a commitment I just don’t think anyone can rightfully make.  But he sure does love roast chicken.  I like to roast chicken for the leftovers and usefulness a poultry carcass can offer.  Stock, soup, chicken pot pie, chicken salad, chicken and biscuits – the list goes on.  So for the price of one chicken you can get approximately 3 meals out of it.  I like those economics. 
I think here it is important to note that an organic chicken will roast and taste much better than a conventional chicken.  Yes the price is higher and the bird smaller, but it will make all the difference in this recipe.  Conventional birds have a lot of fat on them.  So much that I doubt this recipe would turn out well if everything was soaked in that much partially warmed chicken fat.  I don’t like to tell people what to eat when it comes to organic, free-range, local, vegan, sustainable or whatever because everyone has a budget to deal with and their own ideas and feelings in regards to food.  But, in this instance if you purchase an organic bird and taste the results of roasting it in this manner – you will not be disappointed.  (And you may not go back to conventional whole birds).
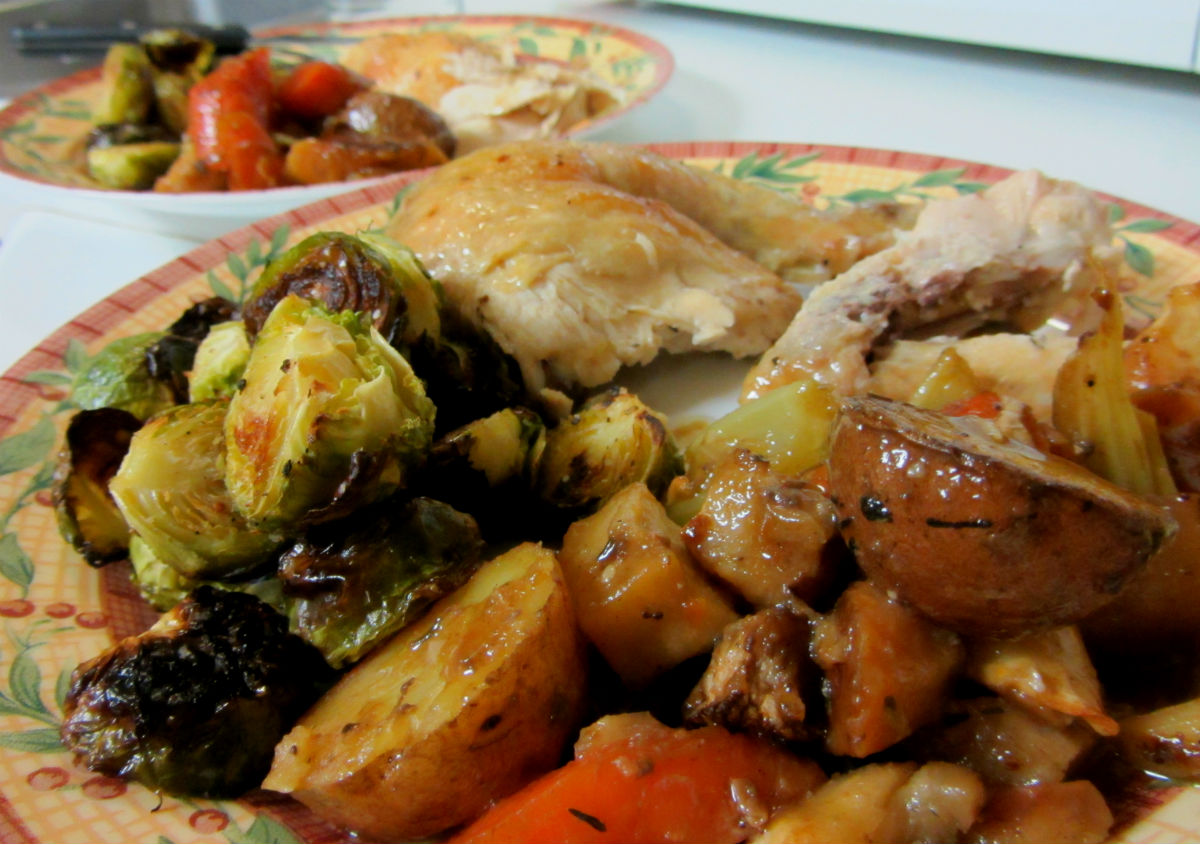
It has taken me a few tries to perfect this, or at least to feel confident enough to share it with you.  The greatest mistake I make in roasting chicken is to not give myself enough time.  I would like to think that I can come home from work, wash dishes, clean up and roast chicken all in about 2 hours – nope.  It always turns out undercooked and not nearly as wonderful, as when I give the chicken its proper time.  So the next time you have 4 hours – yes 4 hours (it might be more like 3 and a half) before dinner needs to be done – roast a chicken.
Don’t let the 4 hour time scare you; you will only be active for hmm about 30 minutes of it.  We found out this method from Thomas Kellers’ Ad Hoc at Home and it really changed the way I roast chicken.  It’s very simple and really, really makes some outstanding chicken.
 

Roast Chicken and Vegetables
As adapted from Ad Hoc at Home

If you don’t have kitchen twine and the thought of trussing a chicken (think poultry bondage) scares you, don’t worry about it.  Just try to cross the chickens legs and use a toothpick to pin the flap of skin up over the cavity of the bird.  And if you don’t want to do that – don’t even worry about it.


For the Chicken
1 whole chicken
¼ large onion, cut in chunks
2 cloves garlic, smashed (not chopped)
1 bay leaf
½ lemon, cut into 4 pieces
2 sprigs Fresh thyme, or 1 tsp. dried thyme
¼ tsp. dried rosemary
Salt and Pepper

For the Vegetables
Remainder of large onion, cut into chunks
2 cloves garlic, smashed
2 medium carrots, cut into ½” slices
2 stalks celery, cut into ½” slices
6 or 7 small red potatoes, cut in half
2 medium parsnips, peeled and cut into ½” slices
1 medium turnip, peeled and cut into ½” chunks
2 sprigs fresh Thyme
1 Tb olive oil
¼ tsp. dried rosemary
¼ tsp. dried marjoram (if you have it)
Salt and pepper
¼ c white wine (optional)


First, take the chicken out of its packaging, rinse and pat dry.  Allow to sit at room temperature for an hour. (This is not long enough to worry about food poisoning)

After about 45 minutes, begin prepping the vegetables and preheat the oven to 475°.  Sprinkle the inside of the chicken with salt and pepper.  Place the onion pieces, garlic, lemon, bay leaf, thyme and rosemary inside the cavity of the chicken.  Tuck the wings of the chicken underneath the breast, you may have to break the wings in order for them to stay there.  If trussing the chicken, take a piece of twine about 3 feet long and move it under the middle of the bird.  Next bring each side of the twine up over the wing joints, and along the bottom edge of the chicken breasts, crossing over at the opening of the cavity – this will plump up the chicken breast. Next, take the twine and wrap them over and then under the legs tying the legs together and closing off the cavity.  Make sure the little tail flap is tucked up underneath the legs, so that the cavity is completely closed. 

Rub the outside of the chicken with another sprinkle of salt and pepper.

Place the remaining vegetables in a cast iron skillet, or heavy roasting pan.  Toss with olive oil, thyme, rosemary, marjoram, salt and pepper.  Place the chicken on top of the vegetables.

Place pan on the center rack in oven with the legs and bottom of the bird facing inwards and cook for 45 minutes.  Then, turn the oven down to 400° and continue to cook for about another hour, or until the chicken is fully cooked. Turn the pan at the time you lower the temperature so that the breast is now facing the inside of the oven.  About 20 minutes into the lower heat cooking time, check the vegetables to make sure there is enough liquid in the pan, if not pour in white wine and continue to cook.

The chicken is done when I thermometer inserted into the thigh reads 160°, and the juice from the chicken runs clear.  You should also have a nice reduced chicken gravy in the pan with the softened vegetables.   Allow chicken to rest for about 15 minutes before carving and serve with vegetables and pan juices.


Wednesday, October 12, 2011

My Oh My It's Fish Pie

Yes, that’s right I am going to be sharing a recipe with you for something called fish pie.  But first I want to bounce an idea off of you.
I kind of want to test out a ton of cookie recipes for the upcoming holiday season.  Does that seem like something you all would be interested in?  I keep coming across recipes that seem like they would be wonderful, and so I stow them away only to choose 5 or 6 between all of them to actually bake.  I will typically spend an entire weekend baking cookies and then I hand them out to neighbors and family.
However, this method tends to lead to madness as most of the cookie recipes are new to me and can inspire foul language and flying objects if things don’t turn out exactly as I pictured them.  But, if I make many cookies leading up to Christmas, I can pawn them off on unsuspecting people and whittle down my choices through a well-documented pseudo-scientific method. (Although I will most likely just make a lot of cookies and still choose 5 or 6 new recipes that turn me into a hyperventilating monster a few weekends before Christmas.)  So, cookies? Cool?  It’s decided then.
Now, on to that fish pie.  This one of the many recipes I took away from working in the Scottish Kitchen at the Folk Life Festival.  It was the first recipe I successfully made on my own after learning it, and it is the only one I specifically asked one of the cooks to share with me. 
It sounds kind of gross, and it doesn’t look super appetizing, but I promise you – it’s good.  I like to use this with leftover cooked fish, but you could always cook your white sauce a bit longer with the fish in it to cook the fish. I have taken the liberty here to dress up the pie a bit, but feel free to pare it back and keep it very simple. Oh and when you do make this, the lighter your mashed potatoes are, the better they will sit on top and spread out over the pie.

Joyce McRaye’s Fish Pie
 Any white fleshed fished can be used here (and I have even seen recipes which call for salmon) such as flounder, haddock or cod. Also feel free to omit the crust; the pie will work just as well without it.


For the Crust
1 c flour
5 Tb cold butter, cut into small cubes
1-3 Tb cold water


For the Pie
1 large shallot, chopped
2 Tbs. Butter
¼ tsp. Thyme
¼ c. flour
1 c. milk
½ lb. cooked white fish, shredded
½ c. frozen peas
Salt and pepper to taste

For the Topping
4-5 medium red skinned potatoes, cut into 1-2” chunks
1 garlic clove, whole
1 Tb. Butter
¼ c. milk or cream
Salt and Pepper to taste

For the crust: cut the butter into the flour until it is course looking, and then slowly add water a teaspoon or two at a time, until the dough comes together. (This can be done in a food processor).

Shape dough into a ball, flatten it to a disc, wrap in plastic wrap and refrigerate for 30 minutes.

Meanwhile prepare the mashed potatoes for the topping.  Boil cubed potatoes with the whole garlic clove in salted water for about 12 to 15 minutes, or until the potatoes can be pierced with a fork.  Drain the potatoes and mash with the butter and milk until well combined.  Add salt and pepper to taste. (Or you can use your favorite mashed potato recipe for this.)

Preheat the oven to 375°.  Roll out the dough and place it into 9 or 10” pie plate.  Prick the crust with a fork and pre-bake it for about 10 minutes. 

While the crust is baking, sauté shallot and thyme in butter over medium heat in a large pan for about 5 minutes.  Next, add the flour and stir constantly until the flour and butter have thickened and are smooth.  Slowly add in milk, whisking to avoid lumps.  Once all of the milk has been added, the mixture should be thick but not too stiff, if it is, add a bit more milk.  If the mixture is too watery, let it simmer for a few minutes on the stove.  Add in the cooked fish and peas, stirring to combine.  Add salt and pepper to taste.

Pour filling into pre-baked crust and top with mashed potatoes.  Bake for about 15-20 minutes or until the mashed potatoes are golden and the crust is browned.  Cool for 15 minutes and serve.


Wednesday, October 5, 2011

Something About Squash

Oh baby, it is squash season. Not the summer squash season where complete strangers will approach you and force overgrown zucchini upon you. No, this is winter squash season. I have resisted you in the past winter squash, but not anymore.
I have noticed that winter squash appeal is much bigger in New England than it is anywhere else. Even when I go home to New Jersey for the holidays, I can never find any interesting winter squash. But up here, squash is the predominant vegetable for the entire winter. And right now – I am very excited about that. (Talk to me in March and I will be ready to take a baseball bat to any orange hued storage vegetable that crosses my path.) So excited in fact, that I now have 2 different kinds of squash on our counter and another pureed variety in the freezer. I have been ripping out all recipes with squash or pumpkin I the ingredient list from magazines, and printing anything squash related from the web as I cross it. If you see with Joe or I later this winter, and you notice a strange orange glow about us, it’s not spray tan – it’s beta carotene!
Now, don’t panic like Joe is doing right now. Squash isn’t all that bad. It’s pretty, it’s sweet and it is very versatile. So if you are unfamiliar with winter squash or if your stomach turns at the thought of eating it, I’ll ease you in slowly. Butternut squash is one of the easiest to work with, and is most commonly found in grocery stores around the country. You can boil or roast it and then mash it, puree it, bake with it, and so on. But it’s always fun to try something new.
That, and everything with a crust tastes good in my book. This is a very pretty dish, and I saw it about 2 years ago in a publication by the Maine Organic Farmers and Gardeners Association. I have been pining to try it ever since. It definitely sounds like something that zealous vegetarians would be attracted to, but I promise that the average meat loving Joe I mean person will like it.

Winter Squash and Kale Tart
as adapted from Roberta Bailey’s Harvest Kitchen
This recipe takes a long time but it is fairly simple to assemble, especially if you use a premade crust. It also is a bit soft, and doesn’t cut super cleanly, so if you are using a smaller egg, I would recommend using 2.

For the crust
1 c flour
5 Tb cold butter, cut into small cubes
1-3 Tb cold water

For the Tart
1 ½ cups cooked pureed winter squash*
2 c kale
1 medium leek, chopped
2 Tb butter
1 egg
½ c whole milk
½ c pecorino, grated (or other hard cheese)
½ tsp dried thyme
1 tsp. dried parsley
¼ tsp. all spice
¼ tsp. nutmeg
Salt and pepper to taste

For the crust: cut the butter into the flour until it is course looking, and then slowly add water a teaspoon or two at a time, until the dough comes together. (This can be done in a food processor).

Shape dough into a ball, flatten it to a disc, wrap in plastic wrap and refrigerate for 30 minutes.

Preheat oven to 425°.

Meanwhile, remove thick stems from kale and chop into ½” strips.

Once the dough has rested, roll it out into a 10” disc, and place into a 9” pie or tart pan. Press the dough in, and remove any excess. Bake crust for 10 minutes, then allow to cool slightly before filling.

In a large skillet, sauté leeks in the butter until softened, about 5 minutes. Add kale and a few tablespoons of water, cover and cook until just barely wilted. Season with salt and pepper and set aside to cool slightly.

Lower oven temperature to 350°. In a large bowl, mix together egg and milk. Then add in pureed squash, cheese, herbs, and spices. Stir in the leek and kale mixture, coating everything. Pour filling into par-baked crust and bake for 55-60 minutes, until the edges of the tart are golden and the center of the tart is solid. Allow to cool for 15 to 20 minutes, slice and serve.


*If you don’t just happen to have pureed squash laying around, take a small butternut squash (or something more fun like Hubbard, Winter Luxury or Kobocha), peel, seed and chop into 1” cubes.  Roast in a 375° oven for about 30 minutes, or until soft.  Toss into a blender or food processor with a tiny bit of water to get it going. Puree until smooth, and set aside for another use!


Wednesday, September 14, 2011

Paella with Panache


Remember how I told you about the lobster stock last week?  Well, get ready cause we’re gonna use it here. 
But a side note, this is not animal friendly.  I murdered two lobsters and plan on showing you the gory details.  I even took video of the lobster still twitching and flailing a full five minutes after I split him in half and scooped out his brains with my fingers. 


At any rate, this recipe is wonderful.  And because there are only a few weeks left that we can successfully grill outside without freezing, I recommend trying this now.  I’ll let all these pictures tell the story and entice you to try this.


Aanother aside, if you tell your boyfriend’s parents that they’ll have lobster paella when they visit, but they are unable to bring their paella pan, you may just get one for your birthday.  Just sayin.


Grilled Lobster Paella
From Bon Appetít July 2011


1/3 c. olive oil
¾ lb. fresh chorizo, cut into chunks
1 large leek, diced
1 Tbs. smoked paprika
2 cups short grain rice (like calasparra, bomba, or abrorrio)
¼ tsp. saffron
5-6 cups lobster stock (closer to 5, but use your discretion here)
2 live lobsters, split in half  and claws cracked (do this just before cooking them)
1 ½ cups peas (thawed if frozen)
Salt to taste
¼ c parsley, chopped
2 lemons, cut in segments for each person


Prepare the grill, and if necessary start other charcoal to add in.  Place a 16” paella pan on the grill, add oil, chorizo and leeks.  Cook, stirring until chorizo is browned and the leeks are softened about 3 or 4 minutes.  Add smoked paprika and rice, coating everything in oil, about 2 minutes. 

Add saffron and 5 cups of lobster stock (you can add the 6th if the rice seems two hard). Stir just at first to evenly distribute everything, then leave it alone.  To ensure even cooking, rotate the pan around thee grill so that each part gets time closer to the heat.  After about 10 minutes, add the lobsters shell side down. 

At this point you can add more coals, but if the heat is fine, close the lid and cook another 10 minutes. Once the lobsters are just red and the meat is opaque, scatter the peas over everything and cook another 5 to 10 minutes so that the rice is cooked and looks dry.  Remove pan from grill, cover and let rest for 5 minutes.  Sprinkle with parsley and serve with lemon segments.  Serves 4 with leftovers.

Thursday, September 1, 2011

A Proper Lobster Bake

It has taken me a long time to write about cooking lobsters. I’ve been waiting for the perfect moment.

There have been quite a few; cooking lobsters at home while a friend visiting from China was with us, borrowing a lobster pot in Rockport Mass from a waitress’ dad, who told us ‘His name is Jim, you’ll know him when you see him’, Driving lobsters down to Philadelphia or driving lobsters to upstate New York, well, you get the picture. We cook a lot of lobsters for guests, as that is what everyone expects from people who reside in Maine. And Joe and I are happy to oblige.

But this time, this time was different. And it was blog-worthy.

The recipe itself is not difficult – get lobsters, steam them, serve with butter and lemon and other things, cover yourself with lobster juice, enjoy. But what really separates this from the other lobster feasts is the combo of when, where, and how that set it apart.
 The best way to steam lobsters is in ocean water.  I’ve tried plain water, seasoned water and wine; but the best lobsters were always cooked in boiling seawater.  This does ruin the inside of a pot, so be warned.  Sometimes you can find little pouches of “Sea Salt” for adding to tap water if you are in a store buying lobsters.  But if you happen to be near the ocean, by all means use some of that instead.   
So let me tell you a bit about the pictures that you see here.  A friend of mine from NJ came up to visit and we went camping in Acadia National Park.  He requested that we have a proper lobster bake.  I considered using driftwood, seaweed, stones and tarps to do this but wasn’t sure all those pieces would come together in protected wildlife areas.  So we opted for literally the next best thing.  A lobster bake over a campfire.   
 Yup, cliffs were scaled to retrieve aforementioned ocean water, a fire built and stoked and tended to boil that water.  Local potatoes, corn and butter were accompaniments and steamer clams and lobsters the main show.  A word of the wise for you though, boiling a large pot of water over an open fire takes a long time, so plan accordingly.  Thankfully we had brought good bread, cheese, tomatoes and plenty of wine to hold us over for dinner.   
 That is not to say the dinner didn’t have its share of challenges.  Besides sending my friend over a cliff in search of water to potentially his death, or the fact that washing a butter covered pot with cold water in another pot that is equally coated in food particles at your campsite could potentially lead to some interestingly flavored coffee the next morning, the meal was very good.  Oh yeah and cleaning the steamers prior to cooking was not something we were able to do, so they were a bit crunchy.  But other than that I would do this again in a moment, and if you are fortunate to have lobsters, ocean water and an open flame you should give it a try as well.