Wednesday, April 28, 2010

Fiddle Me This

I like to consider myself a forager of sorts. When I was young, I tended to eat anything that looked remotely edible. True I had been educated in poisonous plants, berries and especially mushrooms. But if there was a bright red berry on a bush, or even just a sprig of green that caught sunlight the right way – I was going to eat it. I figured if it tasted bad, it might be poisonous and I could just spit it out.
Many years later my sister and I were telling our mom how we used to eat a ton of blackberries from the bush in our backyard at the house we lived at in Connecticut. She looked at us with some slight revulsion and informed us that we did not have a blackberry bush, and she had no idea we were eating things in the backyard. Or buttercups, just because Willy Wonka had buttercups you could drink from, didn’t mean I could nibble on the ones in the front yard. At any rate, we still don’t know what those berries were – but they were delicious and did not kill us, so score one for Jamie and Jen.
Since then I have been known to pluck wild wineberries or the occasional grape off a vine in the woods, but that’s about it. I’d rather consider myself an urban forager. I can hunt down a taco stand that won’t inflict lower gastrointestinal distress, and I know the best places for a drink and appetizers on a sunny afternoon.

So when fiddlehead season approached here in Maine, I was torn. Last year while doing some canvassing work for the Census, I spied a few lone fiddleheads on the side of the road. At least I was pretty sure they were fiddleheads. So I picked them, steamed them and ate them. They weren’t very good. Afterwards, I realized they needed a special set of cleaning and preparation guidelines.
This past weekend, when I bought a pound of cleaned fiddleheads from a woman inside a pickup truck on the side of the road, I thought I would put some more effort into their prep. There have been some reports a few years ago that indicated fiddleheads had caused some instances of food sickness, but there was never any proven toxin found in them. It is most important to make sure they are cooked completely.

If you have fiddleheads in your area, and feel comfortable foraging, or know of a good pickup truck to get them, I highly recommend it. They have a light vegetal flavor, almost like asparagus. And go very well with other spring dishes.

Sautéed Fiddleheads

1 pound fiddleheads
2 TB Olive Oil
3 cloves garlic, roughly chopped
1 tsp crushed red pepper
Salt and pepper to taste
Juice of ½ a lemon

Wash the fiddleheads thoroughly, and remove and brown “gills” that are wrapped around them. Blanch the fiddleheads in boiling water for about 3 minutes. Then place them in an ice water bath to keep their color. Then drain.

In a large frying pan, heat the oil and sauté garlic and crushed red pepper for about a minute. Add fiddleheads, with whatever water is still clinging to them. Toss fiddleheads to coat with the oil mixture. Sauté for about 5-7 minutes, until the fiddleheads are cooked trough but not soft. Sprinkle with lemon juice, salt and pepper.

Wednesday, April 21, 2010

Making Whoopie

Before moving to Maine, I guess I had heard about whoopie pies, but they did not leave a big impression on me. Once I got here though, they were everywhere. Restaurants of all shapes and sizes claim to make the best or biggest (I’m talking dinner plate size). But to tell you the truth, I never really felt the urge to eat one. They were always packed into tightly wrapped cellophane with their fillings pressed up against its edges. There were chocolate, peanut butter, strawberry, maple and the list goes on from there.

Until at work one day we celebrated a birthday. My coworker had specified that we were not to get her a cake, but some of us wanted to do something at least. I mean who could pass up the chance to take a 15 minute break to convene in the kitchen and chit chat. So despite her protests, a friend of mine offered to make whoopie pies for everyone. I was indifferent to that decision, but everyone else was on board, so who was I to poo poo such a Maine tradition.
I wish I had taken pictures of those whoopie pies, but alas, they were consumed far too fast. Each one was a perfect sand dollar sized sandwich of heaven. After my first few bites, I managed to stop shoving the whoopie pie in my face long enough to lean over to another coworker and ask “Do all whoopie pies taste like this?!”
“No.” She told me emphatically. Thank goodness I thought to myself, if they did I would no longer be able to resist them at restaurants, grocery stores and gas stations. I was also happy to know that I hadn’t been missing out all these months. But the ones my friend had put together were far superior to the average (I’m willing to go so far as to say ALL) whoopie pies.
I like the ‘special dark’ cocoa powder in this – I find that it gives chocolate desserts a deeper flavor, and not to mention the fact that the color is so intense. The batter for the cakes is unlike any batter I have made or seen before. It has an almost thick, sticky consistency, but bakes up dense. When I was talking to my friend she told me it’s similar to a thick pancake batter – which is completely accurate.

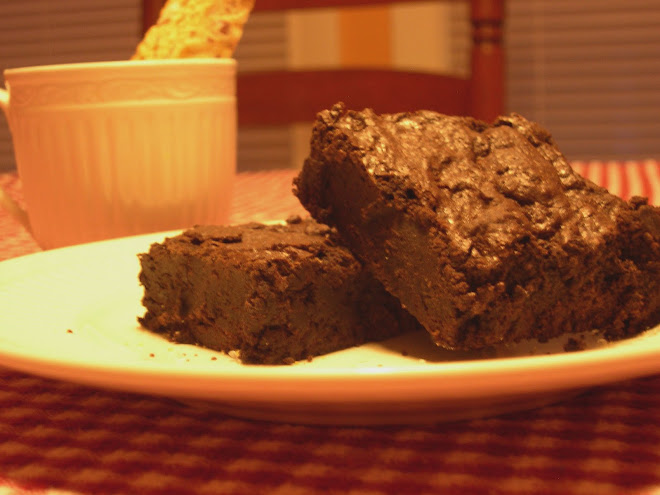
Despite the lopsided and misshapen examples I have here for you, these are very easy to prepare and don’t take a lot of time.
P.S. If any of you have tried any of the recipes I have shared here – please let me know how they have turned out! Leave comments on the post that corresponds to the recipe – and if something doesn’t work out as well, again please let me know. I want t make sure these recipes are perfect for you!!

Whoopie Pies by Mainer, Sharon Beaulieu

For cakes
* 2 cups all-purpose flour
* 1/2 cup Dutch-process cocoa powder
* 1 1/4 teaspoons baking soda
* 1 teaspoon salt
* 1 cup well-shaken buttermilk
* 1 teaspoon vanilla
* 1 stick (1/2 cup) unsalted butter, softened
* 1 cup packed brown sugar
* 1 large egg

For filling
* 1 stick (1/2 cup) unsalted butter, softened
* 1 1/4 cups confectioners sugar
* 2 cups marshmallow cream such as Marshmallow Fluff
* 1 teaspoon vanilla

Make cakes:
Preheat oven to 350°F.

Whisk together flour, cocoa, baking soda, and salt in a bowl until combined. Stir together buttermilk and vanilla in a small bowl.

Beat together butter and brown sugar in a large bowl at medium-high until pale and fluffy, about 3 minutes, add egg, beating until combined well. Reduce speed to low and alternately mix in flour mixture and buttermilk in batches, beginning and ending with flour, scraping down side of bowl occasionally, and mixing until smooth.

For Large Whoopie Pies: Spoon 1/4-cup mounds of batter about 2 inches apart onto 2 buttered large baking sheets.

For smaller Whoopie pies: Drop spoonfuls, onto large baking sheets 2 inches apart.

Bake in upper and lower thirds of oven, switching position of sheets halfway through baking, until tops are puffed and cakes spring back when touched, 11 to 13 minutes. Transfer with a metal spatula to a rack to cool completely.

Make filling:
Beat together butter, confectioner’s sugar, marshmallow, and vanilla in a bowl with electric mixer at medium speed until smooth, about 3 minutes.

Spoon filling onto the flat side of one cake, press the other flat side of another cake on top to push the filling out towards the edges. 

Enjoy!

Thursday, April 15, 2010

Jerking Around

I fell in love with Jerk Chicken a few years ago when I was in Jamaica. Notice how I didn’t write ‘I fell in love with Jamaica’, nope, just its chicken. That’s not to say, that Jamaica isn’t a great place. I’m sure it is. But Negril during spring break is not the best exposure to Jamaica and all it has to offer. In fact spring break Negril only offers 2 for 1 drink specials and reggae at 7am.


I’m just not that kind of spring breaker. Don’t get me wrong I enjoyed going out for a walk at 6:30am to watch kids stumble home, visit the bar as soon as it was open for a breakfast pick-me-up, and then pass out on a chaise lounge with daiquiri spilled on their chests - only to be awoken later to sun poisoning. Good times. I actually tried to lobby a visit to Prince Edward Island for the Anne of Green Gables tour, but I was voted down by some of my other travel companions. Perhaps Charlottetown needs to host some kind of Foam Party…..

At any rate, the jerk chicken was by far one of the highlights of the trip. There were a few vendors grilling butterflied chickens on the beach, along with sliced fruit from a neighboring vendor, that we made a meal out of several times. It was amazing to sit on a balcony, picking at the chicken, and licking the spicy charred sauce off of my fingers.

And since I am dreaming of warmer weather and trying to revel in as much sunlight as possible these days, I thought it might be nice to try and recreate this experience in our backyard in Maine. I hadn’t tried to make a jerk sauce before, so I scoured cookbooks and the internet for recipes. They all seemed fairly similar, with such variables as how many scotch bonnets and other seasonings were included.

Joe and I don’t have a high tolerance for scalding heat in spices, so I decided to substitute the peppers for other ingredients. (And I may have forgotten to buy the peppers at the grocery store, but that is another matter.) Most recipes I found called for 4-5 scotch bonnets, which made my eyes water just thinking about how hot that would be. But if that’s your thing - go for it. I also liked the addition of cinnamon and allspice into the mixture as well as the heat from some pepper.

I only let this marinate on the chicken for about six hours, but most of the recipes recommend letting it sit overnight to help develop the flavors. I had some dried chipotle peppers in the pantry that used to help impart some heat, as well as red pepper flakes. But I’m sure any kind of chile would be fine, depending on your heat tolerance.
Grilled Jerk Chicken
As adapted from Gourmet May 2002

For the Marinade

3 scallions, roughly chopped white and light green parts only
3 large garlic cloves, chopped
1 small onion, chopped
2 dried chipotle chiles, stems removed but seeds included
1 tsp dried red pepper flakes
1/4 c fresh lime juice
Zest of 1 lime
3 Tb soy sauce
4 Tb olive oil
1 Tb salt
1 tsp dried thyme
1 tsp ground allspice
2 tsp black pepper
3/4 tsp nutmeg
1 tsp cinnamon

For the Chicken
1 4-5lb chicken, or enough chicken pieces to equal about 4 or 5 pounds.

Combine the scallions, onion, and garlic into a food processor or blender. Pulse a few times until they are in a fine dice.

Add dried chiles, lime juice, zest, soy sauce, oil and other spices. Process until the mixture is completely combined. It shouldn’t be too pasty, or too runny, just about the consistency of a half melted milkshake.

Butterfly the chicken and place in a doubled zip lock bag (so the bones don’t poke through, I use two bags), or place in a shallow dish. Pour the marinade over the chicken and rub to ensure full coverage.

Be sure to turn the chicken at least once while it is marinating. Let the chicken marinate in the refrigerator for at least six hours or longer if you remember to start the night before.

When you are ready to grill the chicken, remove it from the marinating receptacle and reserve some of the marinade for basting.

Grill the chicken skin side down first, turning and basting as necessary. The marinade will turn black, but that does not mean it is burnt. Check the chicken to be sure it’s done before serving, and let it rest before cutting.

Serve the chicken alongside tropical fruits or grilled vegetables. And I think it’s best eaten with your fingers.

Sunday, April 11, 2010

Easter Feast-er

Hey don’t judge. Rhyming is harder than it looks. But as most of you probably know, this past weekend was Easter. I don’t have any specific recipes for you this week, just some stories and suggestions.
The first year I was in charge of cooking Easter dinner was in college. My friends and I were subletting a town house in D.C. and not everyone was going home for Easter. My parents and sister came down to see me, so we decided to host Easter for all the college and DC transplants we knew. In all, there was going to be about 9 or 10 of us.
I wanted to make ham; that was all I knew. This was also before I really started cooking, and before I really knew what I was doing. Some of the other side dishes I made escape me right now, but I know there was a butternut squash custard, green beans, and maybe potatoes. What really stands out in my mind was how much ham I made.

I took my roommate’s brother grocery shopping with me, which would have been fine, except they were raised as vegetarians. Never ask vegetarians how much ham to serve at Easter dinner. When I hoisted the 8 pound ham into the cart, he looked at me and asked “Do you think that’s enough?” No other word’s strike fear in my heart like those. I never think there’s enough. And if I ask you, if you think there’s enough, you should probably always say YES.
Needless to say I bought a second 8 pound ham. By the time my mother came over from their hotel, I had both hams jammed into a 9x13” pan, and had started cooking them. It took about an hour longer than anticipated, but in all, there was no giant fiasco. My housemates and I happily ate ham sandwiches for the next week. And I gave leftovers to all our guests.

I would love to tell you that I have learned from that mistake, and only buy the amount of food that can be reasonably consumed by two people. But alas, I have not. So this year, I hadn’t planned on eating with our neighbors, I just hoped we would. I bought the smallest leg of lamb I could find – which was still like 7 pounds, not to mention vegetables, appetizers, and cake.
But since the weather was good, we did it all on the grill. I am of the opinion that if you toss any kind of vegetables into a foil pack you can cook them on the grill. This year we had sweet potatoes, red onion and asparagus packets, as well as grilled, marinated red peppers and zucchini. For the lamb I like to cut slits into the meat and jam things into them. This year we tried lemon peel, garlic and rosemary.

Of course, when all was said and done we had about one metric ton of lamb leftover. I counted on Joe to eat a lot of that lamb, but still, that’s only half a ton. So I decided to make a simple lamb ragu to use up the rest.

So my suggestion for this week is ‘Leftover Lamb Ragu’.
Ready?

Shred left over lamb into some tomato sauce, simmer for at least an hour. Serve over pasta.

Yup, that’s it. You can make your own sauce, or if you have a mountain of dishes and 4 loads of laundry to do, I wouldn’t judge if you tossed that lamb into the jar of sauce you keep in the pantry in case work is especially bad and your boyfriend comes home to find you one and a half martinis in. Not that that happens to me. But the lamb will make the sauce taste great. I also add an extra can of crushed tomatoes, a bay leaf and some more oregano to the jarred sauce.