Showing posts with label Pasta. Show all posts

Wednesday, March 9, 2011

Pass the Peas

I try to always have peas in my freezer. This seems like a boring statement, but I find that peas can add dimension to a lot of different dishes. When I am taking leftovers for lunch at work, I like to add peas to my Tupperware. If I’ve run out of vegetables, peas are an easy go-to to have on hand.
This past year was the first time I had ever grown fresh peas, and I am pretty sure, one of the first times I ever ate fresh peas. They were phenomenal. I even tried to keep on little pea pod in the refrigerator as a friendly reminder of spring. But Joe saw the little shriveled yellowing thing and asked to throw it out. I reluctantly agreed. I wasn’t planning on eating it; I just liked looking at it in the fridge.

Hello pea pod! Only a few more months until I plant you again. Then you can have fresh pea pod friends in the fridge again!

But until fresh peas are growing up the chain link fence in the backyard, frozen peas will have to do. And as far as frozen vegetables go, peas are pretty good. Plus peas, butter, salt and pepper make a pretty decent snack.
Although I am not here to extoll the value of a bag of frozen peas to you. I am here to share a recipe. Pea Pesto. Yes, I know the term pesto has been bandied about more than we want, but it sounds sexier then puree, or mash so I am sticking to it. For the purposes of this recipe, let’s assume that a pesto is a basic formula of green + nut + garlic + parmesan cheese + olive oil. You can add salt and pepper, as well as lemon juice or other acid. But these are optional. If you want to make it vegan, omit the cheese and try using a different oily nut like cashews.
So with this basic formula, anything green can be made into a “pesto” of sorts. I have had a very nice spinach pesto a friend made once, as well as other herbal and nut themed ones. However, this pea pesto is easy, cheap and a good recipe to keep on hand. It’s a great pantry recipe, as you probably have most of the ingredients on hand. Feel free to play around with the type of nuts, and any herbs you may want to add.

Pea Pesto
As adapted from Gourmet July 2007

I tried to keep this as basic as possible, but I think the pine nuts and parmesan cheese really help keep the flavor closer to an original pesto. You can make this as thick or thin as you like with the addition of more olive oil. If you keep it thicker, it makes a great spread on crostini.

1 16oz. bag frozen peas, defrosted
½ c pine nuts
2 large garlic cloves (more or less to taste)
¼ c grated parmesan cheese
Juice of 1 lemon
2 Tb olive oil (or more to thin)
Salt and pepper to taste

1 lb. whole grain pasta, such as penne

Combine peas, garlic, and pine nuts in a food processor or blender. Begin to puree. Add cheese, lemon juice and 1 Tb of olive oil. Continue to blend, adding more olive oil as needed to reach desired constituency. Season with salt and pepper if desired.

Meanwhile, bring a pot of salted water to a boil, and cook pasta according to directions. Reserve ¼ c. pasta water, and drain pasta. Place the pesto and ¼ c. water into the warm pot and toss with the pasta. Serve with more grated cheese and little drizzle of olive oil.

Wednesday, March 2, 2011

A Pound of Prosciutto

I bought a pound of prosciutto this weekend. It was a lot more than I had expected. Which is not necessarily a bad thing, it just means that Joe and I needed to consume our fair share of prosciutto. This is a task I am ready and willing to tackle.
I actually have a special relationship with prosciutto. When we first moved here to Maine, I was desperately seeking any form of employment. An opportunity came along for me to be a “demonstrator” at a cheese shop where I would give out free samples of prosciutto and parmesan cheese. It was not my greatest moment and not exactly what my college degree was in, but it did pay.
This event was sponsored by the EU, or at least so I was told. I had to do a 45 minute telephone training prior to handing out samples. Since we didn’t have a land-line at the house we were renting, I sat in Joe’s office and repeated out loud “Prosciutto di Parma” and “Parmesano Reggiano” rolling my r’s and using my best Italian accent. I did learn a little about both items that I did not know before, so all in all it was a win-win.
The cheese shop was a fantastic little place in southern Maine, tons of artisanal products, but the best part was that the owner wore a t-shirt that said “Cheese Wiz” on it. For two days I stood at a tiny little table and cut pieces of prosciutto and parmesan, speared them with toothpicks and handed them out to patrons at the shop. At the end of my two days, I promptly spent all the money I had earned on a selection of other meats and cheeses at the store.
This weekend’s prosciutto procurement was not as fancy (I had a coupon okay!) and not nearly as tasty. Although cured meat is cured meat, and by golly we were going to use it. After wrapping spears of asparagus in prosciutto and baking them, I had about a half a pound left. There was always the possibility of wrapping the meat around my finger and eating it like I used to with fruit roll-ups but I thought I might try something a bit classier than that.
A friend of mine makes a frittata that is great warm or cold and can handle a good deal of cured Italian meats in it. In fact I am a little crazy for this frittata. I told Joe approximately 10 times while eating how much I liked it. It’s inexpensive and filling, looks very fancy and is very mobile for the likes of picnics and such.
Hodge’s Frittata
Cold left over pasta is perfect here. If you don’t have any lying around, boil some up the night before you plan to make this. I think it holds its own better against the egg this way. You can add more vegetables to this, and adjust the amount of meat to suit your tastes.

¼ lb. cooked whole wheat spaghetti (cold)
2 Tb. Onion, diced
1 large handful greens such as spinach, arugula or baby broccoli rabe (what you see in the photos above)
1 Tb olive oil
5 large eggs
8 slices prosciutto (or more), cut in ribbons
Pinch of nutmeg
Salt and pepper to taste

Preheat the oven to 350°. Sauté the onion in olive oil over medium heat in a frying pan. Add greens and sauté until barely wilted. Remove from pan and set aside. In a separate bowl, whisk eggs together with a little water, nutmeg, salt and pepper.

Place ½ of the cold spaghetti in the bottom of the frying pan over medium heat, sprinkle with greens and onion mixture and the prosciutto. Add the remaining half of the spaghetti and pour eggs all over the spaghetti. With the back of a spoon, press spaghetti down to make sure the egg comes up all the way to the top. (It does not have to cover the spaghetti but it should touch everything in the pan.)

Continue to cook the frittata on the stove top for about 3 minutes, until the sides are cooked. Then place in oven and bake until the center is set another 15 -20 minutes. To serve, loosen with a spatula and slip out of pan onto a plate of cutting board. Let cool a few moments and slice. Or let cool completely and refrigerate.

Wednesday, December 15, 2010

I Am Not An Italian Nona

I don’t know if you knew that about me, but I’m not. In fact my WASP-y heritage prohibits me from becoming one, even though this is my lifelong dream. Basically, this means that I want to be really good at cooking Italian food. I’m not bad at it, but it does not come to me with ease or grace.

While in college some of my closest friends came from Italian backgrounds, and I was able to learn some basic principles from them through their family recipes. But as you can imagine, it is hard to cook gigantic dinners in college apartment s and dorms. Not impossible, but hard.
My group of friends and I would try to have “Family Dinner” on Sundays or at least once a week. This would be at various people’s apartments and usually consisted of giant quantities of food (we are talking college aged men here - they eat a lot). My sophomore year college dorm room had a tiny kitchenette that consisted of a sink, a small stove and oven and a refrigerator. There was approximately 2 square feet of counter space, which lead to creative storage and dish drying spaces. When I moved in, my mom unloaded all of her old pots, pans and utensils on me –most of which I actually still have.

In particular she gave me a gigantic stock pot. When I first got it, I said “Mom, I am never going to use this thing – it’s HUGE!” And she replied with a “Well, just keep it, you never know.” And once again the wisdom of mother panned out. I managed to cook up to 3 pounds of pasta at one time in it, which was just about how much was needed for a group of 6-8 college students.
I learned how to make marinara sauce, meatballs, eggplant parmesan and other dishes though the tutelage of college friends. And now, with Joe’s family, I have been able to learn even more about the art of Italian-American cooking. But the very intense crazy 'grandma-only' dishes have yet to be conquered by me.

For example, I tried to make Joe a 'welcome home' dinner this past Sunday of braciole. For those of you who don’t know what braciole is, it is magical. I had a bit of it from a friend’s grandmother once, and I would have had some from Joe’s Nana, except that he ate all of it before I could get my fork in there. Braciole is a piece of meat, either veal or beef, pounded thin and then wrapped around breadcrumbs, seasoning and hardboiled egg. It’s then braised and served with a tomato sauce and pasta. Like I said, magical. So I found a recipe online, and thought I could spend all day Sunday making it.
To make a long story a bit shorter, it didn’t turn out the way I wanted. Joe mentioned that he was glad he was not around to witness the debacle. There was profanity and the throwing of things. Wrapping meat around a filling successfully is my kryptonite in the kitchen. The braciole didn’t look good, but it tasted fine, and the sauce that went with it was great. So that is what I would like to share with you here today. If you know how to make braciole, or if you keep a small Italian grandmother hidden away for such occasions, please feel free to add it to the recipe.

Meat Braised Marinara Sauce As adapted from Tyler Florence’s “Ultimate Braciole”
I typically find Tyler Florence’s recipes good if not a little too involved. But this one looked promising. If you care to find his recipe for braciole, go ahead and give it a shot, but I am just going to share the sauce portion, which is still very good over pasta.

3Tb Olive oil
2 cloves
6 sprigs of thyme (washed but not chopped)
1 small (1-2 pounds) beef roast, or flank steak
1 medium onion, thinly sliced
1 ½ c beef broth
2 bay leaves
1 28oz. can crushed tomatoes (with no additional seasonings)
4 whole vine ripened tomatoes
½ pint grape tomatoes, whole
Salt and pepper
2 Tb balsamic vinegar
3 Tb parsley, chopped

Preheat the oven to 350°, and season the meat with salt and pepper. Heat the olive oil in a dutch oven and add the garlic cloves and thyme. Once the garlic is fragrant, add the meat and brown on all sides. If the thyme and garlic start to brown too much, remove them from them from the oil, and set aside. Once the meat is browned, remove it to a platter and set aside.

Next add the onions and sauté until soft, about 3-4 minutes. Then add in beef broth and bay leaves, scraping up any brown bits on the bottom of the pan. Once the beef broth is boiling, add in the can of tomatoes, the reserved garlic and thyme and stir to combine. Once the mixture is fully combined, add back in the meat.

Nestle in the whole tomatoes around the meat, and toss in the grape tomatoes. Season with salt and pepper. Bring the entire mixture to a simmer, then cover and place in the oven. Cook for about 2 hours, or until the meat is form tender (it will shrink in size a bit). Then remove the pot from the oven, and set the meat on a platter, and shred with a fork. Remove the whole tomatoes from the sauce, as well as the bay leaves and thyme springs. Blend the remaining mixture in a blender or with an immersion blender until combined. Then place the pot over medium heat.

Peel off the skin from the large whole tomatoes, and crush, then return them to the pot. Also, add back in the shredded meat and any juices that may have accumulated. Bring the pot to a simmer. Add in the balsamic vinegar and parsley and simmer for about 5 minutes. Check for seasonings, and serve over cooked pasta.

Wednesday, March 31, 2010

Marsala

I was going to regale you with tales of granola last week. I made 7 cups of granola, and it was good, but not quite right. Well, actually I overcooked the granola. So I have been chipping teeth on rock hard blueberries and cherries all week. So once I get the timing right, I’ll share that recipe with you.

But this week I have something else. I have Veal Meatball Marsala. I love marsala. It’s a different kind of love then the one I have for mac and cheese. That’s more of a lusty relationship. But marsala, I want to bring marsala home to meet my parents, but only to special occasions like Thanksgiving and Easter. Not to the everyday dinners and foibles of a family.


I’ve had the standard chicken or veal marsala. I’ve had great marsala and I’ve had terrible marsala (I’m looking at you hotel weddings). And unlike mac and cheese, I only like marsala when it’s good or great. Mediocre marsala is just a huge let down. So, if I were to bring mediocre home, it would hit on my sister at dinner.

But on one of the first dates Joe and I ever went on, we ate at a restaurant in Washington DC called Grillfish. And I got monkfish marsala, which was a special for that evening. (I know, because I looked for it unsuccessfully every subsequent time thereafter). Which made me think, that maybe you could ‘marsala’ anything. You know, make a bet , dress it up, teach it how to speak, and then bring it out. With a little work, maybe I could My Fair Marsala anything!


Honestly, though, I only stuck to the standards. Until yesterday. When I was grocery shopping, I found ground veal on sale. It was such a good price that I couldn’t pass it up. But I was at a loss for what to make with it. That’s when I thought – Meatballs! This recipe makes a great weeknight meal that feels a little fancy. It’s the makeover movie for unlocking ground veal’s hidden beauty – with marsala!


Veal Marsala Meatballs

For the Meatballs

1 lb ground veal (although I bet chicken or turkey would be fine too)
1/3 c breadcrumbs
1 clove garlic, finely chopeed
½ small onion, finely chopped
2 Tb rosemary, finely chopped
1 egg
Salt and pepper to tatse

For the Sauce

½ onion, sliced
2 cloves garlic, diced
2/3 c dry marsala wine
1 c chicken stock
1 Tb rosemary, roughly chopped
1/3 c heavy cream

1 10oz. bag spinach, thoroughly washed

1. Mix all of the ingredients together for the meatballs. Roll into 1 – 1 ½” meatballs.

2. Heat 2 tablespoons of oil in a large sauté pan over medium high heat. Place meatballs in pan, but don’t crowd the pan, sauté in two batches if needed. Brown on all sides. Then remove to a plate.

3. Add spinach to remaining oil in pan and cook until just barely wilted. Sprinkle with salt, to preserve color, and remove t another plate.

4. While keeping pan on heat, add more oil if needed and onions and garlic. If there is some spinach water left in the pan, that’s fine. Sauté until onions are translucent, about 3 minutes. Then add the meatballs back to the pan. Add in marsala, chicken stock, and rosemary, reduce heat and simmer, covered for about 20 minutes.

5. After 20 minutes, remove lid and continue simmering for another 10 minutes. Season with salt and pepper. Just before serving add in cream to help thicken the sauce.

6. Meanwhile cook whatever pasta you want to serve this over.

7. To serve, place pasta on a plate or bowl, add spinach on top of pasta, then spoon meatballs and sauce over everything.

Thursday, February 25, 2010

Pasta Imperfect

Early on in our relationship, Joe gave me a hand-cranked pasta machine for my birthday. Now, this many have been one of those self serving presents we sometimes give to others, but at least Joe has helped with the pasta making each time we’ve brought it out. Which, has not been as often as it maybe should’ve been. I thought two pieces of the machine had gotten lost in a move across the country, and we waited a year for back ordered parts to come in from Italy.


The first time I tried the device, I dove in head first and tried to make a ricotta ravioli (I have the ravioli filler/form attachment). I tend to do that. Start with the hardest option and wonder why it doesn’t work out so well. I believe we ate leftovers or ordered in that night after I lost my temper and started throwing ricotta and dough balls around the kitchen.

The next time we decided to try the machine, I had had 2 years to cool down and Joe, acting as the voice of reason, decided we should start with a basic egg pasta. There are a lot of egg pasta recipes out there. We chose an easy one from Gourmet, that required minimal drying, and minimal prep. The results were fine. Although I think they ended up more as dumplings then a toothsome pasta, there was no chucking of dough or lost tempers.

This past Sunday we decided to give it another go. But since we already did our basic pasta duty, I wanted to take it to the next level. In consulting with Marcella Hazan’s Marcella’s Italian Kitchen, I found the next level. I knew this was the way to go when she compared rolling out the dough to jumping off a building as a means to get to the bottom. It’ll do the trick, but you won’t like the results. You need patience and to take the right steps in order to get the best end result.

We chose to make a spinach dough. And since that seemed rather attainable, I thought it would be a good idea to make a double batch. Everything went swimmingly until just at the end. As hunger set in and space to lay the pasta out ran in short supply, we hit a snag in the recipe. Now don’t get upset, I know ‘How dare I claim a snag in Marcella’s recipe! Blasphemy!’ She was so in depth, so militant about the rest of the process, that her directive to dry the cut noodles for about 10 minutes seemed easy. But it wasn’t mentioned to make sure they do not stick to one another. The other pasta recipe we had tried suggested we toss the noodles with flour and let them dry as individual separate strands. So when we tossed all the pasta into giant clumps on kitchen towels to dry… let’s just say there was some dough flinging.

But for the strands that survived, the end dish was pretty darn good. We tossed the cooked pasta with a light sauce of tomatoes, onions, garlic, bay scallops and Maine shrimp. So if you happen to have a few hours one Sunday and you want break out a gift you may have gotten but never used. I suggest making pasta.

Spinach Pasta
As adapted from Marcella’s Italian Kitchen

Makes approx. 1 pound of pasta.

2 large eggs
1 ½ cups flour (I found I needed about 2+cups)
½ pound fresh spinach, stems trimmed

1. Wash the spinach in several changes of water – even if you have bought bagged spinach. Set the spinach in a colander that fits into a larger bowl. Fill the bowl with water until it comes up over the spinach. Move the spinach around in the bowl to help shake off dirt and sand. Pull the colander out of the bowl then drain the water from the bowl. Do this process a few times until the water in the bowl is clean and free of sand. Remove the spinach from the water, but don’t dry it, you’ll need the water on the leaves t help wilt them.

2. Place spinach in a sauté pan over medium high heat and cook with ¼ tsp salt, covered, stirring occasionally until tender. For baby spinach cook for about 5-7 minutes, and for larger older leaves, cook about 10-12 minutes.

3. Remove from heat and let rest until cool enough to handle. Squeeze all the water out of the spinach and chop finely.

For the Dough

1. Place the flour on a clean surface, such as the counter or a large wooden cutting board. Make a well in the center of the flour and add eggs and spinach.

2. Beat together the spinach and eggs with a fork. Once combined, start incorporating the flour into the well with your fork. Gradually add more flour to the center until the dough becomes too thick to work with the fork.

3. Start kneading and working the dough with your hands, adding more flour if the dough gets sticky (and it will). To knead the dough, push the mass with the heel of your hand and your fingers bent over the edge, fold the dough in half. Give the dough a half turn and repeat the pressing and folding process. Marcella is very adamant that you spend about 8 minutes working the dough. As you continue you will need less flour, and the dough is ready when you can press a finger midway through the dough and it comes out clean.

4. Divide the dough into 4 parts. Cover the dough you aren’t rolling with clean dry kitchen towels. Set your pasta machine at its widest setting and roll the dough through. Fold the dough into thirds, and give it a quarter turn, then pass through the machine again. Place the thinned sheet under the kitchen towel as you thin the rest. Once all your sheets have passed through the widest setting, set the machine to the next setting. And repeat with the dough. At this point you don’t need to fold each sheet and run it through a second time – just run it through successively smaller incriments. Continue this thinning, through all the machine settings, or until you reach a thickness you like. (We stopped at the 2nd smallest)

5. Let the sheets dry on the kitchen towels for about 10 minutes. Place the pasta cutting attachment on your machine and choose whatever width you want. Or you can hand cut the sheets. Let the strands dry – separated on kitchen towels for a little while. Lightly toss some flour onto the noodles, to keep them from sticking to one another.

6. Set a large pot of salted water on the stove. Once boiling, pick up the kitchen towels by their four corners, and dump the pasta in all at once. Stir to loosen any clumps. Cook for about 5 minutes –testing the pasta often to check doneness. Once finished, strain the pasta and toss with your favorite sauce.

Wednesday, February 17, 2010

Getting Things Started

So, I set up this blog a few weeks ago, and hadn’t been able to take the plunge until now. I’ve been cooking, don’t get me wrong. But each time I think to myself ‘Oh this is a good recipe, maybe I should try this one’ it turns out all wrong, or I run out of time, or the pictures don’t come out. Which reminds me, let me apologize for the pictures that will be on this blog. I am not very adept at using my camera and I still need to purchase a tripod. So if the pictures are slightly blurry, please know that I tried.


Anyways, my idea for this is to share with you recipes that I try, adapt and eat which seem worthy. And believe me there are a lot out there that are not worth sharing. I am pretty hard on myself when it comes to cooking, especially if I want other people to try it. And Joe (you’ll hear more about him as this progresses) is always very complimentary about the food I make. As long as it isn’t peppers stuffed with vegetables.
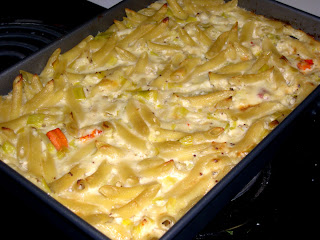

So in lieu of that, I came across a recipe from an issue of Gourmet last year - Baked Penne with Farmhouse Cheddar and Leeks. And I must tell you that I am sucker for macaroni and cheese. All kinds. Powdery fake cheese like substance, rich and creamy homemade stuff, dry and old sitting at the bottom of a restaurant pan, anything. It’s almost shameful how I lust for mac and cheese. So when I came across this - I figured, farmhouse cheddar cheese? yes. leeks? yes. penne? yes. This recipe also calls for “hot pepper sauce”. Which may seem a little strange at first -but trust me (yes you hardly know me, but I won’t steer you wrong). I once had a scallop chowder at a restaurant on Catalina Island and the waiter recommended that I add a few dashes of hot sauce to round out the flavor. Now this was by no means a fabulous restaurant, so I didn’t expect much, but when I did… wow! So the addition of hot sauce won’t be too much here, just enough to…wow!

The real reason I finally tried this recipe was because lobsters were on sale this week at the grocery store and I had a coupon. Now, I am not rubbing anything in here, but I live in Maine. So when the opportunity comes along to buy a lobster with a dollar off coupon - it’s hard to pass up. The only problem was, my coupon was only for ONE lobster. And it would be cruel to steam one lobster for one person while the other gets sprayed with errant lobster juice. So I decided to add my discount lobster to the pasta dish. If all those chefs can do it - then why can’t we? And what better way to kick this thing off then with some fancy schmancy mac n’ cheese.


Baked Penne with Farmhouse Cheddar, Leeks and Lobster!
(Or Fancy Schmancy Mac n’ Cheese)
as adapted from Gourmet March 2009

This recipe calls for 5 cups of leeks. Well, leeks weren’t on sale this week, so I used about 3 cups, and the recipe still tasted great, but 5 cups would have made it more complex - so I recommend 5 if you can get them. Try to get good extra sharp cheddar, but any extra sharp will do. As for the hot sauce, if you have a favorite brand, use it. If not try Sriracha, since it’s all the rage now.

1/4 cup butter
5 cups chopped leeks (white and pale green parts only; about 5 large)
1/4 cup all purpose flour
3 1/2 cups whole milk, warmed to room temperature
1 pound extra-sharp cheddar cheese, coarsely grated (about 4 cups packed)
1 tablespoon Dijon mustard
1 teaspoon hot pepper sauce
2 large eggs, at room temperature
1 pound penne pasta
1 (1-1 ½ pound) lobster (or more if you have more coupons)

First put about 1” of water into the bottom of a large pot, and place on medium-high heat. You can add flavorings to this water if you want, but since it’s for a lobster that will be coated in cheese, I say don’t bother. Once the water is boiling, place the lobster in the pot and cover. Steam the lobster for about 6-7 minutes, or until it turns bright red. It doesn’t need to be completely cooked through, but the shell should still be red.

Once the lobster is done, remove it from the pot and let rest until cool enough to handle. Don’t worry about keeping the lobster chunks pretty, they will be cut up anyway. I like to pull off the claws first, and then attack the tail. But do it any way it’s easiest for you. Once the lobster has been picked, set the meat aside.

Lightly butter 15x10x2-inch baking dish. Melt 1/4 cup butter in heavy large saucepan over medium heat. Add leeks; stir to coat. Cover saucepan and cook until leeks are tender, stirring occasionally, about 12 minutes (do not brown). Uncover saucepan; add flour. Stir 2 minutes. Add the milk; bring to simmer, stirring often. If the milk starts to boil, remove it from the heat, and turn down your burner - you don’t want it to be too hot or your sauce will break. Add cheese, mustard, and pepper sauce. Stir until cheese melts. Remove from heat. Season cheese sauce to taste with salt.

Whisk eggs in medium bowl. Slowly whisk in 1 cup cheese sauce, to warm the eggs to sauce temperature. Stir egg mixture into cheese sauce in saucepan.

Meanwhile, cook pasta in large pot of boiling salted water until just tender but still firm to bite, stirring occasionally. Drain. Return to pot.

Stir cheese sauce and lobster into pasta in pot. Transfer to prepared baking dish.

Preheat oven to 400°F. Bake pasta until cheese sauce is bubbling around edges and some ends of pasta are golden brown, 25 to 30 minutes.

Let stand 15 minutes. Serve hot.

I find that leftovers of this are best served cold from the refrigerator. Most cheese/egg sauces don’t enjoy being in the microwave. But re-warming it in the oven should be ok.