Wednesday, June 29, 2011

Seductive Strawberries

I have been trying to concentrate and think of a good story or something very witty to write for you this week, but in the immortal words of Johnny in Surf Ninjas “I’ve got nothing.”
I did go strawberry picking on Monday, and then proceeded to eat almost 2 full quarts in 2 days, so my stomach is punishing me for it.  But I couldn’t help it!  The strawberries were so good.  Perfectly ripe, juicy, sweet and in my refrigerator.  I was probably the only person this spring who didn’t mind all the rain we were getting.  The combination of cool rainy days and then warm sun filled ones make for some spectacular strawberries. 
Joe was once again happy that he didn’t have to accompany me on this agricultural adventure.  And I was glad that my raincloud of practicality was not following me around, it allowed me to pick almost 12 pounds of strawberries and an additional 2 pounds of fresh peas.  When I came home I could hardly wait to start eating the berries, but I managed to contain myself until after dinner. 

The combination of sliced strawberries, still warm from the sun, that are so ripe red juice coats your fingers, on top of cold dairy products is unspeakably wonderful.  So if you can, pick a few (or more) quarts - I highly recommend it.  Go on a day after rain, but while it’s sunny.  You will be amazed at the superiority of these berries over anything you could ever get in a supermarket. 
Well, I don’t have a strawberry recipe for you this week.  Sorry.  I did make a rhubarb cake this weekend, and it’s pretty delicious but I apologize for not having any tantalizing pictures of strawberries.  I’ve eaten (or frozen) them all.
Rhubarb Cake
While this bakes, it makes the whole house smell exactly the way freshly made cake should smell.  It is what candles and air fresheners try to achieve.  The cake itself is dense and moist, with a large crumb.  It works very well with mounds of sliced strawberries over it.

5 cups rhubarb, cut fairly small
½ cup butter, softened
1 ¼ cups sugar
3 eggs
1 tsp. vanilla
1 2/3 cups white whole wheat flour
2 tsp. baking powder
Pinch of salt
2/3 cup chopped hazelnuts

Heat the oven to 400°.  Grease a 10” spring form pan and set aside. 

Mix the flour, baking powder and salt together in a small bowl.
Cream together the butter and sugar until light and smooth, about 5 minutes.  Beat in the eggs one at a time, and then mix in the vanilla.  Gradually add the flour mixture and stir until just combined.  Fold in the rhubarb.  The batter will be very stiff, almost like cookie dough.
Press the batter evenly into the spring form pan, and smooth the top.  Sprinkle with the chopped hazelnuts. 

Bake for 35-45 minutes, or until the cake is set and it has pulled away from the sides of the pan.  If the cake is browning too quickly, cover loosely with aluminum foil midway through.

Allow to cool, then remove the band from the pan, and slice and serve. Preferably with super ripe sliced strawberries.
Wednesday, June 22, 2011

At A Loss

Summer officially began yesterday at 1:16pm.  To be honest I was at a bit of a loss for what to write about this week.  You see in one and a half weeks, I will be going to Hawaii for a friend’s wedding.  I cannot think of anything else.  I try, but I can’t.  I’m actually having nightmares about not being able to go, or accidentally cancelling my plane tickets. |
So finding a recipe that I want to share with you has not been at the top of my list.  Sorry.  I did my standard grocery shopping trip, looking in the garden and reading all things food related that I can get my hands on, but nothing inspired me.  I am stuck in a food rut.  But only in the sense that sometimes it’s nice to go back to things you have had before.  I mean I am trying some new dishes this week.  But I never feel comfortable sharing them unless I know that they turn out well, especially when they come from another source. 
Also in preparation for Hawaii I have been watching my wallet a little more closely.  I am trying not to buy fifteen different ingredients for one dish (it’s hard, but I am trying).  So Monday night when I came home from work, I asked Joe what he wanted to do with the salmon I bought.  It was nice out, so grilling it seemed to be an option, but we don’t have a grill basket, so the thought of charred on bits of fish stuck to the grill wasn’t appetizing to anyone.
We thought of foil packets, our trusty method for grilling anything that won’t ordinarily grill well.  We have been tossing stuff in foil packets for years now, and usually the results are always a hit. So we had foil packets, we had salmon and we had some “spicy greens” from our farm share to toss in.  Initially I was thinking of an Asian inspired flavor, but Joe isn’t as crazy for fish sauce on fish as I might be.   I let my mind work on it for an hour or two while I was at the gym (again Hawaii in a week and a half).  And you would be amazed at what watching the Food Network while sweating it out on a treadmill will do to your creative juices. 

We decided to try something, and I am going to share it with you even though we have only ever made it once.  But it was so simple, and used ingredients you might already have on hand, I thought it would be worth it to send your way.  Plus sometimes it’s nice to have something new on the grill in the summer.
Marsala Salmon Packets
Never mind the color of the greens under the salmon, it will happen when they cook too long.  And feel free to toss in mushrooms or other ingredients to your liking.  We served this with some buttered pasta, but anything would go well here.  Makes 2 packets.

½ pound sockeye salmon, cut into portions
4 cups ‘spicy’ greens such as mustard greens or broccoli rabe
1 medium onion, thinly sliced
1 large clove of garlic, minced
2 sprigs of rosemary
3 Tb. Marsala, divided
2 Tb. Olive oil, divided
Salt and Pepper


Prepare your grill.

Place two overlapping sheets of foil onto the counter, they should be about a foot long.  In the center of this, place 2 cups of the greens, it will seem like a lot, but they will cook down.  Next, sprinkle with half of the onion and garlic, then top with salmon portion, skin side down.
Season salmon with salt and pepper, and place the rosemary on top.  Curl the foil slightly upwards to prevent any liquid from leaking out and pour Marsala and olive oil around fish. 

Fold two sides in towards the middle, then bring the other two sides up over the fish and fold them down (or roll them down) together towards the fish.  I prefer to keep the packets a bit loose, but Joe likes them rolled more tightly for ease of moving them around the grill.
Place on the grill over direct heat and cook for about 10 minutes.  You can always open a packet to see if the fish is cooked.  Remove from grill and serve.


Wednesday, June 15, 2011

Two Bites and A Push

First a little update about the ant invasion in my garden box.  After almost destroying the plants with a shower of vinegar, placing cinnamon all over the garden and then circling it with boric acid, the ants were merrily trotting about the plants as though everything was not covered in supposed poison.  A simple Google search of “ants on fava beans” lead me to pictures and discussion boards from people with similar problems.  Apparently, black aphids like to eat the plants especially under tender leaves and near the flowers.  The aphids secrete a sweet substance that the ants eat, and the ants will protect the aphids in order to eat the aphid excrement.  A few well-placed sprays of water mixed with dish soap knocked off the aphids and ants, and with the temperatures in Maine being more “Maine-like” the plants are doing okay.  I may yet get a few fava beans this summer!
Right, so back to the post at hand.  Two bites and a push.  This describes the proper size of a fish taco.  I actually didn’t know this until Joe told me last week.  I have eaten and made fish tacos quite a few times and had never heard it described like that before.  I guess I was too focused on the food.
Fish tacos are marvelous.  If you have never had one, I beg you to try and find a restaurant serving them near you immediately.  In Long Beach, we typically got Baja style fish tacos, so that is what I will share with you here.  But fish tacos are really very versatile.  You can grill, broil, bake, poach or fry the fish and eat them with any array of condiments and toppings.  This would be a huge post if I gave you all these options so I will try to stick to just the Baja style. 
Baja style means fried fish topped with a type of spicy cabbage slaw in a corn tortilla.  The version I made was decidedly New Englandy, but I encourage variation and experimentation when making or trying your own. 
Fried Fish Tacos
I made these with a Baja style red chile sauce, both in the breading and in the slaw.  If you can’t find the ingredients for it, feel free to use the substitutions at the bottom of the page.


For the Fish
1 lb. firm white fish (suck as cod or haddock)
1 egg (with ¼ c. of the red Chile Sauce if so desired)
1 c. flour
1 c. bread crumbs
Olive oil
 

For the Baja Style Red Chile Sauce (as adapted from Bon Appetít February 2011)
2 chipotle peppers in adobo sauce, chopped
3 cloves of garlic, sliced
2 Tbs. olive oil
¼ tsp. ground cumin
¾ c. water


For the Slaw
2 cups shredded green cabbage
¼ of a red onion, sliced very thinly
1 c. fat free sour cream (or Mexican Crema if you can find it)
¼ c Baja Style Red Chile Sauce
Juice of ½ a lime
¼ tsp. ground cumin

For the Tacos
Corn Tortillas
Cilantro
Sliced Avocado
Lime Wedges

For the Baja Style Red Chile Sauce
Heat olive oil in a small pan over medium heat, add the chipotle peppers and garlic.  Fry until garlic is tender about 3-5 minutes.  Remove from heat and add cumin.  Pour into blender with water and blend until smooth.  Set aside.

For the Slaw
Combine sour cream, Chile sauce, cumin and lime juice.  Stir to combine.  Pour the sauce over the shredded cabbage and red onion in a medium bowl, tossing to combine evenly. Set aside until ready to serve. 

For the Fish
Whisk the egg and Chile sauce together in a small bowl.  Place flour and breadcrumbs in separate bowls.  Season bread crumbs with salt and pepper.  Slice fish into strips.  Heat enough olive oil in a medium sized frying pan so that the oil is about ¼” deep. 
Next, coat the fish in flour, then the egg and finally the breadcrumbs.  Carefully place fish strips into heated oil and repeat until the pan had 4-5 strips in it.  Fry the fish on all sides about 4 minutes total.  Remove fish to a paper towel lined plate and repeat with remaining fish strips.

To serve the tacos, heat up corn tortillas (wet a paper towel and place about 6 tacos inside the paper towel inside a plastic bag, microwave on high about 45 seconds, or longer until the tortillas are soft and pliable).  Place a tortilla onto a plate and place a fish strip in the center of the tortillas.  Top fish with slaw, cilantro and avocado slices.  Squeeze with a lime wedge.  This should be eaten in 2 bites and one push. 

 Substitutions:  If you don’t want to make the red chili sauce or if, like me, you can’t find chipotle peppers in your central Maine grocery store – use the following for the slaw.  Substitute Chipotle flavored Tabasco in place of the sauce.  You can also use any kind of fish you’d like but the firmer the fish, the more easily it will fry.  

Wednesday, June 8, 2011

I Wish I was a Windian

My first brush with Indian food was when I was fairly young.  A business colleague of my dad’s would send him a jar of Tandoori paste, among other things, every year for Christmas.  At one point, my mom was brave enough to use the bright orange condiment, though I forget how she prepared it.  There were most likely instructions on the jar, something about cooking chicken and adding the paste.  It did not go over well in our family.  In fact it became sort of a joke for us to receive said jar every year, and they started to accumulate in our pantry. Until my Aunt told us how wonderful Tandoori paste was and that she would happily relieve us of it.
This was my only impression of Indian food until I went to college.  And I have been happily consuming pretty much any form of Indian cuisine put in front of me ever since.  My college roommate for all four years was of Indian descent and she introduced me and our other roommates freshman year to the wonders of Indian fare by ordering a slew of dishes from a local restaurant and then sitting in a circle on the floor of our dorm room and going to it.  Of course the home cooked meals I had at her family’s house and as leftovers brought back to school were far superior, but nevertheless, I was hooked.
I managed to glean a few general recipes from friends and families along the way, but typically I rely on the ever present Indian restaurant to fulfill any cravings.  That is, until we moved to Maine.  Yes, there are some Indian restaurants in the ‘big cities’ of Portland and Bangor, but both of those are about an hour away.  And when the need for chana masala hits, it hits hard.
I do have a few Indian cookbooks in my possession, but sometimes it seems like the steps and time necessary to produce something remotely similar to what Baa (Gujarathi for Grandmother) could whip up in no time would take me days.  I found that I could easily make a version of chicken Tikka, which paired with frozen samosas and a packet or two of microwaved side dishes could fill the gaping Indian food hole in my stomach. 
But pouring packets of palak paneer into bowls straight from the microwave can only sustain a girl for so long.  I had to learn to make my own side dish.  I have the spices and I have the desire, so it should be no problem.  That is what I am going to share with you today.  My Indian side dish.  I claim no regional accuracy for this recipe, but it tastes good and can satisfy any curry craving that might creep up on you.
 
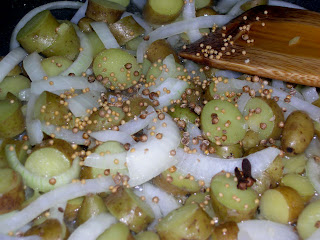
Indian Spiced Green Beans with Potatoes and Tomatoes
I like to use whole spices if I have them, but you can always use ground here instead.

1 ½ pounds fresh green beans, trimmed
½ pound fingerling potatoes, yellow fleshed preferred
1 pint grape tomatoes cut in half
2 Tb. olive oil
½ large onion, sliced
2 cloves garlic, minced
1 Tb fresh ginger, minced
½ tsp. coriander seeds, crushed with the back of a spoon
½ tsp. Mustard seeds
2 whole cloves
¼ tsp. ground turmeric
½ tsp. curry powder
2 Tb. Plain yogurt
Salt and pepper to taste

Slice the fingerling potatoes into coins and place in a large skillet.  Add about a cup and a half of water and boil until potatoes are soft and water is mostly evaporated.  Next, add the oil, onion, garlic and ginger and sauté until fragrant.
Add green beans, coriander, mustard seeds, and cloves tossing to coat.  Add another 1/3 cup of water and cook, covered until green beans are tender.  Then add the turmeric, curry powder and tomatoes, tossing to coat all vegetables in spices.  Cook about one minute, then add in yogurt and salt and pepper.  Stir to combine and serve. 

Serves 4 to 6 as a side dish

Wednesday, June 1, 2011

Ants and Artichokes

Somehow it went from 48° and rainy to 80° and humid seemingly overnight.  I refuse to complain about this, as it is June 1st and we were due for spring to finally arrive.  Things are popping up in the garden, and we have even managed to harvest some radishes, albeit with bite marks from the thousands of ants helping themselves first.  I have resorted to an organic arsenal of chemical weapons to be used without restraint to combat these little moochers.  Gallons of vinegar and a bottle of ground cinnamon later, I hope to be able to eat the products of my little garden – even if they do taste like a deranged salad.
Mostly I am trying to keep the fava beans and kale I planted intact.  I’ve already told you about my love for these two items and I am willing to go to great lengths to prevent the destruction of them.  Yesterday as I poured a gallon of vinegar over the tiny brown ants while laughing maniacally I briefly worried about some sort of retaliation, but hopefully it won’t amount to that. I guess time will tell.
In the meantime, we have been grilling a lot.  Not just because of the heat, but because the light in our kitchen is burnt out and we can’t figure out how to remove the fixture to (1) see what kind of light bulbs need replacing and (2) to actually do the replacing.  So rather than try to cook in the dark, we moved the main portion of our dinner prep outside.  This gives me an opportunity to monitor the ants and to enjoy the cooling evenings at the same time.
Joe and I have done a lot of grilling in the time we have been together, and not all of it results in perfectly charred dinners.  When we were still living in D.C. we tried to grill whole baby artichokes.  I was told they were very good and that you could eat the whole thing.  I was sold.  But when we tried to eat them, they were fibrous and prickly; I was determined to try them again. 
This past weekend I finally saw a package of baby artichokes at the grocery store and begged Joe to let us try them again.  I was confident I had read enough about them to correct the flaw in our original preparation.  I scoured the cookbooks I had and realized with horror that apparently everyone but me knows how to properly cook artichokes.  How do I know this?  Because there are literally no comprehensive instructions for preparing them for the grill.  Most of the recipes I found said to “prepare artichokes for the grill.” That’s it!  Arg!  How am I to know how to prepare them, yes they are technically “entirely edible” but I have experience the error in that logic. 

Further research and some trial and error later, we did manage to make (and eat) some grilled artichokes.  They are quite good, especially when dunked into a garlic aioli.  So if you are feeling adventurous this weekend and have access to baby artichokes, give this a try.

Grilled Baby Artichokes with Faux Aioli
12 – 15 baby artichokes
4 lemonsOlive oil, for brushing artichokes
Salt and Pepper
3 Tb mayonnaise
2 cloves garlic, finely chopped
½ tsp. salt
First, place a large pot of water on the stove.  Juice 2 lemons into it and set aside (do not turn on water yet). 

To prepare the artichokes  - cut off the top 1/3 of the artichoke, then peel off all of the lower outer leaves and trim the stem to about ½ inch long.  Place the artichokes into the pot of water with lemon juice and repeat with the remaining artichokes.  The acidified water will help prevent the artichokes from turning brown on the cut portions. 
Then, place the pot over medium high heat and boil artichokes for about 7-10 minutes.  They should be soft enough to pierce with a fork.  Meanwhile, prepare an ice water bath, once the artichokes are softened, drain and place them in the ice water to stop the cooking. 
Preheat the grill.  Once the grill is ready, slice the artichokes in half and rub with half of a cut lemon, again to prevent browning.  Then brush the cut sides of the artichokes with olive oil, and sprinkle with salt and pepper.  Grill until browned and softened.

For the aioli, mix the chopped garlic and salt together to form a paste.  Add to the mayonnaise with the juice and zest from one lemon.  Stir to combine and refrigerate until ready to serve.

Serve the artichokes with slices of lemon from the remaining ½ of lemon and prepared aioli. 

P.S. Apparently pouring vinegar on your garden is not a good idea.  I managed to destroy all of the lettuce and most of the radishes I planted and only slightly damaged the fava beans and beets…and the ants are still there.